Beet root, potatoes and peas tikki / cutlets

It has been many months since my last post. A friend rightly pointed out that it’s that perfectionist attitude in me which is causing this inertia – I want the food to be perfect and the photographs to be styled and taken well (to the best of my ability!) However, to get all these things together, requires a lot of time and patience. With an extremely active 3 year old in the house, time is one luxury I don’t have.

As a result, I have been cooking and experimenting at home but unfortunately, I haven’t been able to post anything for the past few months. I feel a little selfish at this point so I definitely owe you all an apology. Many of you have been supportive over these past few months of silence – either by checking on me or by just by being connected through images that I have been posting on my facebook page (http://facebook.com/sublimepalate). A big thank you for that and sorry for being MIA.

So, I have decided to give that perfectionist in me a sorta break..  And post recipes and stories .. even though sometimes the pictures may not be perfect.. the recipes may…  – NO,  be rest assured – there will be no compromise on that front!:-) These photos are taken from my phone, so please excuse me if they aren’t nice enough.

So, starting off again, here’s a recipe of a healthy snack, I read on one of my favorite blogs, sinfully spicy.  This is a great snack for kids and adults alike! I took a portion of the tikki mix to make 3 tikkis for V. To the remaining portion, I added finely chopped green chillies.It is inspired by Tanvi’s beetroot tikkis. Ever since I saw that, I just had to make it! So for Tanvi’s recipe, check : http://sinfullyspicy.com/2012/06/27/beetroot-tikki/

Thank you Tanvi for this amazing snack! 🙂

Here’s how I made it:

MAKES 8 tikkis / cutlet:

You’ll need:

Beetroot: 1 medium sized
Potato: 1 small sized
Peas: 1 cup. Boil if using fresh. I used frozen peas and microwaved with a tiny pinch of salt for 2-3 mins to soften it so that it’s easy to mash.
Onion: 1 small size (or roughly 1/2 a cup of finely chopped onion)
Ginger: 1 small pc (adjust to your taste)
Garlic: 1-2 cloves
Green chillies – 2-3
Black pepper powder – 1 tsp (preferably coarsely powdered)
Bread crumbs – 4 heaped tbsp. (If you don’t have bread crumbs, use a slice of bread. Gently soften it by sprinkling a little water and mashing it separately first and then adding it to the mix).
Semolina (Suji) – 3 tbsp or more for coating the tikkis.
Oil – 1-2 tbsp.

Preparation:

  1. Boil the potato so that they are cooked but firm. A little undercooked is fine but mushy potatoes may not bind the mix that well.
  2. Finely chop onions, ginger, garlic and the green chillies.
  3. Finely grate beetroots. Squeeze out the juice by hand. Drink the juice (It was yum .. I strained it and had it without adding anything. But I think a squeeze of lime should go very well). Anyhow, coming back to the grated beetroots, keep it in aside and move on.
  4. Peel and finely grate the boiled potato. If you are brave, try grating it while it is hot! Just kidding – DON’T ! I almost burnt my palm. The inside of the potato retains a lot of heat so it’s advisable to take a little break and grate them when they have cooled off.
  5. Mash the softened peas.
  6. Start working on the next step (mixing) only before you need to make the tikkis. The salt releases a lot more moisture and makes it difficult to bind.
  7. In a mixing bowl, add the grated potatoes, beets, mashed peas, onions, ginger, garlic, bread crumbs, black pepper powder, chaat masala & finally the salt. Gently combine this mix without mixing it too much! The more you mix, the more moisture gets released and your tikkis won’t hold together.
  8. Make small cutlets / tikkis with this mix (oval or round shape can work). With this quantity, I ended up with 8 tikkis.
  9. In a flat plate, keep the semolina. Very gently press the tikki on the semolina mix to coat the tikki with the semolina.
  10. Heat 1 tbsp of oil in a non-stick pan. I fried about 3 per batch in a small non-stick pan. Add more oil when frying the next batch, if needed. Make sure the oil is hot before you add the tikkis. On low heat, fry the tikkis for a few minutes on each side until crisp on the outside. Be gentle when turning the tikkis. If the heat is low, cook for a little longer to get a crispy outside while making sure the inside is cooked.
  11. I had these with my go-to green chutney!

Hope you enjoy them as much as I did.

Advertisement

Dal Makhani / Ma ki Dal / Creamy Black Lentils

Black Lentils, Ma ki Dal, Dal Makhani, Kaali Dal or Urad Dal with skin – This Dal as you can tell has so many different names and that probably only indicates how widely loved and popular it is!

Growing up, this Dal did not hold an important place in my Mother’s pantry. I am not sure why. It isn’t a commonly made Dal in Eastern Indian homes for that matter. It’s associated with “restaurant” food in most Eastern Indian homes. For a long time, I had Ma ki Dal in dhabas and restaurants only.

No surprises here but like many of you, it’s one of my favorite lentils. I almost always never missed an opportunity to have this Dal during my years in Delhi and every possible trip back there. The creamy texture combined with the buttery flavor is enough to make anyone crave for Dal Makhani. It is very sinful and equally desirable due to the generous amount of cream and/or butter that goes in it. I am, not by any means, a health freak but over the years I started getting put off by the amount of butter that was used in it. A number of restaurants put so much butter and cream that you’ll have a tough time tasting any Dal in it. I craved for Dal Makhani without the indulgence.

And so… few years ago, I started my quest to make my own Dal Makhani.

I can completely understand if a lot of you will frown at the lack of lots of butter or cream, but my thought process behind this recipe was the following:

– Make it in a way that my family can have it on a regular day without feeling guilty.
– Make it quick without too much advanced preparation. (Unfortunately, I don’t plan my meals in advance most of the time)
– Keep as much of the creamy texture and taste without going overboard with the cream / butter.

Dal Makhani or Ma ki Dal is usually cooked with a small portion of Rajma (kidney beans). I make both versions of Dal Makhani (with only Black Lentils as well as a combination of Kidney Beans or Rajma & Black Lentils). If you are adding Rajma, replace ¼ cup of the Black Lentils with ¼ cup of Rajma. It tastes great in either combination! However, the use of Rajma requires advance planning and preparation.

Ensure your Rajma is soaked for about 8 hours. Alternatively, soak Rajma for 2-3 hours in hot water and then boil it separately until soft. I used Chitra Rajma (the smaller pale orange colored Rajmas) for cooking as they cook much faster. I soaked them for 8 hours in hot water, then pressure cooked them together with pre-soaked Black Dal for 20 mins. Black Dal was pre-soaked in hot water for 15 mins.

I skipped the Rajma this time as I hadn’t planned it ahead and it was a weekday dinner.

Dal Makhani / Ma ki Dal / Creamy Black Lentils Recipe

To print this recipe, click here.

Serves: 2-3

Ingredients:

Whole Black Lentils / Whole Urad Dal (with skin): ¾ cup [Can be replaced by: ¼ cup Kidney Beans (Rajma) + ½ cup Whole Black Lentils]
Cumin seeds: 1 tsp
Ginger finely chopped: 1 tbsp
Garlic finely chopped: 1 tbsp
Tomato puree: 1 cup (see step 2 below)
Chilli powder: ¼ tsp (or as per taste)
Cooking cream: 2 tbsp for cooking + 1-2 tsp for Garnishing
Kasoori Methi: 1 ½ tsp loosely packed
Garam Masala powder: ¼ tsp
Butter: about 1 tbsp
Salt: to taste

How I did it:

  • Clean and wash the Dal. Soak it covered in hot water for 30 mins.
  • Meanwhile, prepare the Tomato Puree: Put 2 medium sized tomatoes in a pot with sufficient water to almost cover the tomatoes. Bring the water to boil until the skin of the tomatoes starts to break. Remove from water, put in another pot with tap water and a couple of cubes of ice. When the tomatoes cool down, remove the skin. Blend it in a paste without adding any water.  This gave me roughly 1 cup of tomato puree which I needed for this recipe.

  • When the Dal is soaked (i.e. 30 mins later), throw away the water. In a pressure cooker, add the Dal with ¼ tsp of salt and 3 cups water. When the first whistle blows (or steam builds up), cook on low heat for 15 mins. If you are not using a pressure cooker, cover and boil in a pot until the dal becomes soft.
  • Meanwhile, wash the kasoori methi with a little water.  Soak it in ½ cup of hot water for about 10 mins.
  • When the Dal is cooked, let the steam from the pressure cooker come out on its own. If a lot of the liquid has evaporated, add more water. I didn’t have to add any. Now on medium heat and without the lid on, boil the Dal by stirring it continuously and mashing it gently against the pressure cooker wall using the back of your ladle (see pictures below). Keep doing this vigorously for about 8 mins or until the Dal starts to have a creamy texture. This step is important to get a creamy consistency.

  • Heat a heavy bottomed pot or non-stick kadhai. On low heat, add butter. When the butter melts, add the cumin seeds. As they begin to sputter, add the chopped garlic. When it starts to turn brown (Note: this happens very quickly), add the tomato puree, ¼ tsp of salt and the chopped ginger.
  • On medium heat, cook the masala for 6-7 mins. When the masala becomes like a lump, add the chilli powder. Keep stirring to ensure masala doesn’t get burnt. The masala should be done in another 2-3 mins. You will notice the color of the masala become darker and shiny due to the oil that surfaces on it. If the masala starts to stick, sprinkle a little water and scrape it off using the spatula.

  • On low heat, add the above prepared Dal to the pot with the masala. Stir the Dal and the masala well so that there are no lumps of masala and it’s evenly combined.
  • Now add the cooking cream. The color of the Dal will become slightly lighter. Cover and simmer for 10 mins, stirring every 1-2 minutes, gently mashing it with the back of the ladle to help achieve the creamy consistency.
  • Next add the kasoori methi along with the soaked water. Continue to cook for another 5 mins on low heat, stirring in between. By now, the Dal should have become darker in color than what it was when you added the cream.

  • Check for salt. Adjust if needed. Add garam masala powder and give it a good stir. Cook for a further 2-3 mins before turning the heat off. Let it sit for 5 mins to help combine all the flavors. It’s now ready to serve.
  • Garnish with some fresh cream and enjoy with hot Rotis / Parathas / Rice or any bread of your choice and some onions and green chillies on the side.

Notes:

  1. Dal has a tendency to become thick as it is left to cool. You may need to add some hot water (about ¼ cup) and make it warm before serving.
  2. Optional: Add a tbsp of butter just after turning the heat off. Tastes heavenly! I don’t do that usually unless I am feeling particularly ecstatic on a given day! 😉

[UPDATE 7th July, 2012] Sending this Dal Makhani recipe to My Legume Love Affair #49, the popular, legume-centered event that is conceptualized by Susan of The Well-Seasoned Cook. This month’s MLLA is hosted by Simona. Here’s the announcement for July’s MLLA. http://briciole.typepad.com/blog/2012/07/annuncio-legumi-che-passione-numero-49.html.

Street food: Ghugni [Spicy Dried Peas] and hawker memories

A bunch of tired and restless kids wait patiently. Or at least, appear to. After what seems like an endless wait, the moment arrives. School bells ring intensely thereby declaring the end of a long day. Silence gives way to the cacophony of ecstatic children. Like honey bees, we come out buzzing from every corner of the school. As we make our way out of the school gate, street food hawkers greet us with big smiles, some freshly prepared food and a lot of enthusiasm! Some call out to us by our first name. They are all set to make their daily sale and we are more than happy to oblige!

It is extremely difficult to resist such wide variety of street food. We were faced with a moral dilemma – to snack or not to snack. No amount of hygiene education on the part of our parents or teachers helped, ever! Undoubtedly, snacking on street food was the unanimous choice! When you have aromatic chaats, savory and spicy delights tempting you, you can’t possibly walk away from it! I couldn’t. Not then.

One such snack was ghugni (dried peas soaked in water, boiled and then cooked with spices, garnished with onions, green chillies, coriander leaves and a blend of spices). The combination of tangy and spicy is what makes it extremely desirable!

“Sankara” was THE man who introduced me to ghugni during my school days. A small-built, modest man, with a striking long moustache – that’s how he looked like as far as I can remember. He didn’t, by any means, sell the best ghugni but he was definitely one of the most popular ones probably because his ghugni was the most conveniently available! It was available at the right time and right place for street-food-starved children who were waiting to dive into all that junk as soon as we were out of school boundaries. I can confidently say that generations have grown up on his ghugni and will never be able to forget him for that experience. Sankara has become a legend in my eyes and probably in the eyes of most of most of my school mates.

Ghugni is a very popular snack from the Eastern part of India. It’s made in many different ways using dried green peas, dried yellow peas, chickpeas (chhole), black chickpeas (kala chana) and fresh peas. I have made it with dried green peas. Feel free to use any other type of peas but bear in mind that the soaking and cooking time for each of the above is different.

To print the recipe, click ghugni.

Ingredients for cooking the ghugni:

Dried Green Peas: 1 Cup
Red Onions: 1 large or 1 ½ medium sized, finely chopped. (about 1 ½ cups chopped onions)
Cinnamon stick (dalchini): a thin 2” stick
Dried Bay leaves (tejpatta): 2 small
Cooking oil: 1 ½ tbsp
Ginger paste: 1 tsp
Garlic paste: 1 tsp
Tamarind pulp: roughly equivalent to 1 tbsp dissolved in 1/2 cup of warm water.
Garam Masala Powder: 1/4 tsp
Salt: to taste
Hot water: 2 cups for soaking the dried peas. More water may be needed depending on the consistency of your ghugni.

In a small bowl, make a spice paste with the following and keep aside:
Turmeric powder: ¼ tsp
Cumin powder: ½ tsp
Red Chilli powder: ½ tsp
Water: 2 tbsp

Ingredients for garnishing :

Red Onion: 1 small-medium sized, finely chopped
Coriander leaves: a bunch, finely chopped
Green chilies: 6, finely chopped
Black salt – to taste (optional)
Chaat Masala – can be bought from any Indian store
Roasted and powdered Cumin Powder (In a pan, on slow heat, dry roast cumin seeds until they become darker. Let it cool. Dry grind it to a powder. I usually make more (about 1/2 cup) and store it for future use).
Roasted and powdered Dry red Chilli (In a pan, on slow heat, dry roast about 10-15 dry red chillies until they turn dark and before they start to burn. Let it cool. Dry grind or pound to make chilli flakes or coarsely grounded red chilli powder. Again, this can be stored for future use).

How I did it:

  1. Wash the dried peas in tap water. Soak them in enough hot water to cover the dried peas. Cover and set aside. At the end of 2 hours, you will notice that the peas swell up in size.
  2. Boil the soaked peas in a pressure cooker with 2 cups of water and a pinch of salt for 10 mins. Check if peas are done and boil uncovered, if needed. They should be soft but not mushy.
  3. In a kadhai or pan, heat the oil. Once hot, add the bay leaves and cinnamon stick. Fry for about 30 seconds when the aroma starts to come out
  4. Next add the chopped onions and 1/4 tsp of salt. Fry on medium-high heat until the onions are golden brownish. Keep stirring in between to make sure it does not burn. This may take 6-8 minutes.
  5. Add the ginger and garlic paste. Continue to fry for another minute.
  6. Add the spice paste made above (turmeric, chilli powder and cumin powder in water). Fry for another minute.
  7. Add the boiled peas along with the water left over from boiling into the cooking pot or kadhai. Using a strainer, strain the tamarind juice adding the juice and excluding any seeds or fibres. Rub the tamarind with your fingers to make sure you extract any left over pulp. Stir and check for salt, tangy and spicy flavors. Adjust to suit your liking.
  8. Boil on low heat, covered, for about 7-8 minutes or until the flavors have combined.
  9. Sprinkle garam masala powder and check for salt and spice. Adjust if needed. Cook for another 2-3 minutes until the ghugni is done.

To serve:

Take about ¾ cup of hot ghugni in each serving bowl. Sprinkle about 1 tbsp of chopped onions, ¼ tsp green chillies and 1 tsp of chopped coriander leaves. Sprinkle a pinch each of black salt, roasted cumin powder and chaat masala. And it’s ready to eat.

The quantities mentioned in the serving suggestion above are just to give you a rough idea. The beauty of this snack is that you are able to adjust each ingredient to your liking.

Finish the ghugni experience with a hot cup of tea.

Notes:

  • The garnish is a very important part of this snack. So, do not skip or ignore any of the ingredients.
  • Dried Green peas cook very fast once they have been soaked. Do not pressure cook them for more than 10 minutes. Else, they may become really mushy! You can always boil them more later once you have checked.
  • The peas should be soft without losing it’s shape. It should not disintegrate. If you have soaked them for longer than 2 hours in hot water or for more than 4 hours in normal water, boil them for a shorter period in a pressure cooker or boil them in a pan instead of a pressure cooker to make sure it doesn’t get overcooked.
  • If you do not serve it immediately after cooking, you may need to add some hot water and give it a boil before serving to make sure the ghugni is not dry. The peas tend to absorb the curry when left for some time so you may need to add more water just before serving. Check for salt if you have added more water.
  • If you need to add more water once the ghugni is cooked, use hot water to speed up the cooking process.
  • Optional: Green chutney serves as an additional garnish on this dish!
  • Some people like to have it with a bit of yogurt or add tamarind chutney on top.

Teesi – Indian Spiced Flax seeds Powder

Summer. A season not many appreciate or look forward to. Especially if it is anything like the summer one experiences in many parts of India. I, on the other hand, have a different story to tell.

For as far back as I can remember, I always looked forward to summer. The heat didn’t dampen my spirits. The train journey to my grandparents home, the love of mangoes and lychees, the day and night fun with cousins, the self-declared little or no studying just made it my favorite season of the year!

Every summer vacation started with a long train journey to visit my grandparents. A journey where getting the window seat was of utmost importance, almost like my life in the next 24 hours depended on it. Well, it almost was. With a constant gaze outside the window at surroundings that kept changing every kilometer or less, I soaked in the countryside of India. A journey where I could peek into the daily lives of many, often left wondering what their story was… Where little children played fearlessly beside the train tracks.. Where hawkers that came every few minutes made the journey seem worthwhile.

Mom always prepared meals for the train, so we never got to eat the meals sold onboard. I wasn’t too happy about it then. It was not until recently that I ate the meals served on the train. The verdict: A deep appreciation of my Mom’s efforts in preparing food for the entire family!

Summer vacation was synonymous to abundance of mangoes followed by lychees, all from my grandparents’ orchard. We would get boxes (or petis as they are called in the local dialect) of mangoes and lychees as they came in season – sheer bliss!

Apart from the freshest seasonal produce, we were privileged to have some of the best home cooked meals. My grandmother (or Mai as we called her) was one of the best cooks I have ever known. Her cooking philosophy involved using different types of spices but in the right balance. Every spice in her spice box came with a purpose and it was through the magic in her fingers that she would use them in the right place and the right proportion to transform something extremely simple to exemplary.

One of my favorite things that Mai prepared was “Teesi”. Teesi is traditionally had in Bihar. It is prepared by dry-roasting brown flax seeds together with some spices and stored as a powder. It is usually prepared and stored in airtight bottles to prevent moisture from coming in. We always packed Teesi on the way back home and enjoyed it for the next 2-3 months.


Indian Spiced Flaxseed Powder or Teesi
:

To Print this recipe, click here.

Ingredients:

Flax seeds: 1 cup
Dried bay leaves: 3 small
Dry red chillies: 4 (Use more if you like)
Coriander seeds: 2 tablespoons
Salt: 1/3 tsp (adjust to taste)

How I Did it:

Heat a pan. On slow heat, Dry roast each of the ingredients above (except salt) separately. The ingredients should be roasted separately as the roasting time for each ingredient varies. In order to avoid any burning, make sure you stir continuously during the roasting process.

Flax seeds when done start to sputter. Be careful and make sure the heat is slow and the flax seeds don’t get burnt.

Once all the ingredients are roasted, allow them to cool.

When the ingredients have cooled off, combine all the ingredients together with the salt and dry grind it to a coarse powder using the dry grinder / miller attachment of your food processor.

Store in an air tight jar at room temperature. Teesi is usually had as a condiment with your regular meal or added to natural yoghurt (dahi) to make it more flavorful. You can simply add it to your regular Dal and Rice for adding flavor to an otherwise regular meal. The usual serving of Teesi is about 2 tablespoons. Having said that, food is a personal experience and has to be had in the way that one enjoys it. So, go on and enjoy this simple, healthy and flavorful condiment in the way you like it.

Spiced Yogurt with Eggplants [Baingan ka Raita]

Regional and authentic cuisine has been a subject of interest amongst historians and foodies alike. As much as I appreciate and treasure a traditional dish for it’s originality and authentic flavors, the next generation and perhaps, to some extent, many of us have contributed in blurring the lines between authentic and fusion food.

Having been exposed to various cultures, the food that we eat or cook today at home is influenced by these cultural differences. Over a period of time, these regional recipes have become internalized by families who have adopted it and in due course given it a place in their “family recipe book”. The other effect that is a result of this migration process is a certain loss of identity of the original recipe, other than those documented by historians or food enthusiasts.

The migration of food is not a new phenomenon by any means. However, as the world becomes smaller, recipes are now only about two-clicks away. The evolution and migration of recipes seems much more fast-paced than ever before. A traditional dish from Peru if made with ingredients which are easily available, would very likely make its way to the kitchen of a family living in a remote town in India. In all likelihood, they would have improvised an Indian version of that dish and perhaps that would be a favorite of the youngest member of the family !

Today’s recipe goes back to my roots and has a nostalgic feel to it. A simple yet delectable dish made mostly in this form in Odisha (Orissa) and Bihar : Spiced Yogurt with eggplants or Baingan ka Raita. Having grown up under the influence of both Oriya and Bihari cuisine, Baingan Raita was made at home often and has been one of my favorite ways of having yogurt.

A Raita [pronounced rahy-tuh] is a condiment made with Yogurt as the base with spices and some vegetables. It’s made all over the Indian sub-continent in many different combinations but most commonly with onions, tomatoes and/or cucumbers.

To print the recipe, click here.

Baingan ka Raita (Spiced Yogurt with Eggplants / Brinjals) :

Serves : 3

Ingredients for preparing the Eggplants :
Eggplants (Brinjals) : 1 long, cut into thick rounds and then quartered)
Turmeric: 1/4 tsp
Salt: 1/4 tsp
Curry leaves : about 10
Black mustard seeds : 1/2 tsp
Asofetida (hing) : a pinch
Dry red chillies : 2 (torn in halves)

Ingredients for preparing the Raita :
Natural unsweetened Yogurt (Home made Curd / Dahi) : 1 cup
Low fat Milk (cold or at room temperature) : 1/3 cup
Roasted Cumin powder : 1/2 tsp
Chilli powder : a pinch
Salt : 1/4 tsp (adjust to taste)
Black salt (kala namak) : a pinch (optional)

How I did it :

Wash the eggplants thoroughly. Add turmeric and 1/4 tsp salt and leave aside for 5 mins.
In a Kadhai or frying pan, heat 1 tbsp oil. Add hing, mustard seeds and dry red chillies. Wait till mustard seeds pop. Next, add curry leaves. Stir for about 10 seconds and add the Eggplants.

Cook uncovered on medium-low heat until the skin is roasted and the eggplants are cooked but not mushy or breaking. Once done, take it out in a serving bowl and let it cool (5 – 10 mins).

In a bowl, whisk the yogurt using an egg whisker or spoon into a creamy smooth consistency. Add the milk. Mix it together.

Add roasted Cumin powder, Chilli powder, salt (1/4 tsp) as well as Black salt. Mix it into the yogurt.

Once the fried eggplants have cooled off, pour the yogurt mix into the serving bowl. Combine everything together using a spoon (without mashing the eggplants).

Let it chill in the refrigerator for at least 20 mins (or more) before serving.

Enjoy as a side with any meal.

Maithan : the birth of Laksa leaves Pakoras with Spicy Coriander and Mint Chutney

A trip back home is synonymous to meeting relatives and a gastronomical treat that is limited only by your own will power. Our last trip home was essentially that.

While in Kolkata, we spent a weekend at Maithan (or Maithon). With an open mind and no expectations, we set out on a train journey to Kumardhobi, followed by a 25-minutes autorickshaw ride to Maithan. The first half of the auto ride was bumpy and gave you a quick glimpse of rural India.  It transformed almost seamlessly into one of the finer roads in India. Soon, we were on the Damodar Valley Dam which is built on the Barakar river, a tributary of the Damodar river.

We stayed in ‘Mazumdar Niwas’ a guest house for DVC (Damodar Valley Corp.) guests. The guest house is in a small island in the lake which is formed as a result of the dam. A short walkway connects the guest house to the mainland. The view from the guest house is nothing less than spectacular and undoubtedly the best in Maithan.

Maithan means (Mai-Than or Ma ka Than or Mother’s abode). It is in Jharkhand and borders West Bengal. It’s a very popular picnic spot for people living in nearby areas. One can spot them from a distance as you see and hear bus loads of people and blaring music from time to time. Unfortunately, the wastes that are left behind after these picnics, ruin the otherwise beautiful neighborhood. For more information on Maithan, you can visit here or here.

Maithan is a very small place and a weekend is sufficient to do any sight seeing here. I highly recommend a 2-hour boat ride in the lake. The best time to go is around 3pm in order to witness the brilliant colors of the sky as the sun sets over the lake.

Our daily meals were very simple, mostly at the guest house or at a nearby hotel. There isn’t much to mention in that respect, except of course, one place: the inspiration behind today’s post.

The pakoras or fritters (more about Pakora here) made by a small family-run shop, located at the main entrance of Mazumdar Niwas are simply sensational ! The place is run by a very humble gentleman, Mr. Chitto Ranjan Debnath, together with his wife and their son. You will find a variety of pakoras made with onions, cottage cheese and potatoes, amongst other things. I fell in love with these pakoras at the first bite – perfectly soft in the inside and crisp on the outside. Mrs. Debnath kneads the dough with her magical fingers and Mr. Debnath fries them into a golden crisp texture – creating something totally extraordinary! Their warm hospitality only contributes to making this experience a memorable one.

I was so inspired by it that ever since that trip, I have tried to make pakoras in many different ways at home. Of course, to have the best, you need to visit Mr. Debnath’s shop in Maithan 🙂

Pakoras with a unique blend of Indian and South-East Asian flavors – Pakoras flavored with laksa leaves (Daun Laksa or Rau Ram or Polygonum Odoratum).

Laksa leaves are used as garnish for Laksa, a very popular Singapore noodles. These herbs are also eaten fresh in some Vietnamese and Thai salads and used to flavour soups and stir fries. Laksa leaves have a penetrating smell with a citrus note and a refreshing, hot, biting, peppery after taste. In my opinion, fresh laksa leaves have an uncanny similarity in taste to Paan or betel leaves.

Laksa leaves and Spinach Pakoras Recipe:

Though the Debnath family shop served it with a garlic chutney, I enjoy these pakoras with a spicy Coriander & Mint chutney.

To print the Pakora recipe, click here.

Makes about 40 bite-sized pakoras.

Ingredients:

Besan (Gram flour): ¾ cup
Baking powder: 1/8th tsp
Turmeric: ¼ tsp
Chilli powder: ¼ tsp
Salt: ½ tsp regular salt
Black Salt: ¼ tsp
Aamchoor powder (Dried Mango Powder): 1 tsp (Available in Asian/Indian stores)
Water: 2 tbsp
Onion: 1 ½ medium sized, thinly sliced
Ginger: 2 tsp, grated
Garlic: 1 clove grated (equivalent to 1 tsp of grated garlic)
Green chillies: 2-3 finely chopped
Spinach leaves: 1 cup, finely shredded
Fresh Laksa Leaves: ½ cup, finely shredded
Mustard Oil: 1 tbsp for mixing with the batter
Regular oil for deep frying
Chat Masala for sprinkling once the pakoras are fried – a pinch for every batch of 10-15 pakoras (optional)

How I did it:

  • Sieve Besan and Baking powder together.
  • Add all the ingredients in a bowl except the oil for frying and chat masala.
  • Combine all the ingredients together using your fingers. The batter should be sticky enough so that it does not crumble while deep frying later.
  • Let the mixture sit for 15 mins to let the baking powder do it’s job.
  • Heat sufficient oil in a deep wok or kadhai.  Check if the oil is hot by dropping 1 tsp of the batter in the hot oil. If the batter starts sizzling instantly, the oil is hot and ready. Taste it to make sure the seasoning is adequate and per your liking.
  • Use approximately 1 tsp of batter to make the pakoras. Make them in batches of 10 or more depending on the size of the wok / kadhai used.

  • You can either use 2 tsps to give the batter a round shape or the tip of your fingers to drop the pakoras in the hot oil.  The point to remember is each pakora will use roughly 1 tsp of batter.
  • Fry on medium-low heat taking care that the batter is reddish brown but not burnt. Sprinkle a pinch of chat masala over a batch of 10-15 pakoras. (I forgot to do it) Serve immediately.
  • Best enjoyed on a rainy afternoon.. With coriander and mint chutney and a hot cup of tea.

Variations: You can also make these pakoras by omitting the laksa leaves, if you can’t find them and increase the shredded spinach to 1 ½ cups.

Alternatively, omit the Spinach completely by increasing the proportion of onions (use 2 medium sized) with the same proportion of Laksa leaves

Coriander and Mint Chutney Recipe:

To print this recipe, click here.

Makes 3/4 cup Chutney

Ingredients:

For blending:
Fresh Coriander: 1 and ½ cup of roughly chopped coriander leaves. Remove roots and stem.
Mint leaves: 1/2 cup. Pluck mint leaves from the stem. Discard stalk. Use the leaves only.
Ginger: 1” pc
Garlic: 1 clove
Green chillies: 2-3
Mustard oil: 1 ½ tbsp
Water: 2 tbsp

For seasoning:
Salt: ½ tsp
Black salt: ¼ tsp
Lemon juice: 1 tbsp

How I did it:

  • Blend all the ingredients listed above under heading “For blending” until a thick and uniform paste is formed.
  • Take it out in a bowl and add the “for seasoning” ingredients listed above.
  • Combine thoroughly with a spoon.
  • Check for salt / sour taste and adjust as per your liking.

This chutney tastes best when fresh or a maximum of 2-3 days. Make in small batches to always enjoy this chutney at it’s best.

A beach vacation in Khao Lak | ..and Thai Green Curry paste

R & I are always looking for reasons to travel. Both of us love traveling but our motivations are different. Yet, one thing unites us : FOOD !

A well-planned but badly executed surprise holiday was in the making. It was R’s birthday last weekend.

At first, a dear friend spilled the beans – Phuket! I dodged that one somehow because we were going to Khao Lak, 1.5 hours drive from the Phuket airport. And then it was me – a terrible case of ‘slip of tongue’ 😦 So, just before the trip started, R knew exactly where we were going. And I cursed myself for it !

We landed very late that night. A prearranged car and driver was waiting for us at the Phuket airport. In my far-from-perfect-Thai, I explained to the driver that we were hungry! He took us to a small eatery nearby selling Khao Man Gai (Thai Chicken Rice). Khao Man Gai brought back memories of my university days in Bangkok. It was a standard meal for the times when I needed to have a quick lunch in between classes. Lost in nostalgia, I had an extra plate of chicken and two bowls of soup !

Our resort, Ramada Khao Lak, was a solitude by the beaches far from the madness of Phuket. The room was tastefully furnished with modern fixtures, a fancy jacuzzi indoors and sun-loungers in the balcony – perfect for a romantic vacation.

We were here to unwind and soak in every bit of sea, sand and sun.

The sun-loungers by the beach were highly sought after. We were almost always the last takers. As the boys played in the sun, I sat there listening to the sound of the sea. My mind drifting along with the whoosh-whash of the waves. I couldn’t help but imagine the plight of the many people who were here, just like us, more than 7 years ago when the giant Tsunami hit the Asian subcontinent. Khao Lak was one of the worst affected areas. I shuddered as images of those giant killer waves kept flashing in my mind…

After a couple of hours, we headed to the nearby shacks for lunch. What a treat that was! Tom Yam Prawns, Basil Chicken, Papaya salad, Spicy Noodles, and more – all phed phed (extra spicy). And some chilled Singha Beer to cool us down 🙂

As the sun went down, we strolled to the nearby local weekend market. What better way to experience a place than to shop and eat where the locals do ! One street dedicated to fresh spices and herbs, another to street food and yet another to the 199-Baht clothes and souvenir shops. The aroma of fresh basil, mint, coriander, lemon grass, galangal and lime leaves are enough to give anyone hunger pangs! As we just about managed to get past that, the most vibrant, innovative street food awaited us – Smoked pork balls, coconut pancakes, fried chicken, Stick noodles (Phad Thai) and much more! Needless to say, we kept sampling all the food as we walked along.

V chose an Angry Bird t-shirt for himself, which by the way he calls ‘bad birds’. Soon our little boy was getting cranky. It was dinner time. We were in the mood for something authentic, and not toned down for ‘foreigners’. A small Thai family restaurant down the road was the unanimous choice. They made a Stir Fried Prawn and Vegetable dish for V – Thai style but without chillies and he loved it! We had our share of everything spicy – fried fish, garlic chicken, stir fried prawns, stir fried vegetables and a yum load of sauces to go with it!

A little bit of pampering in the spa was exactly what we needed to end this long and tiring day.

More on the vacation in my next post for fear of exceeding the word count limit, if any!


To give myself a continued sense of that perfect beach vacation and to celebrate my love for Thai food,  I wanted to share one of my all time favorite curry recipes. I first made the curry paste and then used it to make a curry. I will share the curry recipe in the next post.

How to make Green Curry Paste:

To print this recipe, click here.

Ingredients:

Shallots: 8
Thai Garlic: 15 cloves
Lemon grass: 3 stalks
Galangal: 1 ½ “ pc
Fresh Green Peppercorns: 10 pc
Kaffir Lime rind: of ½ a lime
Thai Green chillies: 15
Sweet Basil leaves: 1 cup
Coriander seeds: 1 tbsp
Cumin seeds: 1 tsp
Shrimp paste: 3 tsp

How I did it:

Dry roast the cumin and coriander in a pan on low heat. This may take about 3-4 mins. Let it cool.

Finely slice the galangal (or Thai ginger) and shallots. Wash the Thai garlic thoroughly. If using Thai garlic, you can keep the skin. If using any other garlic, peel the skin first.

Smash the end of the lemon grass stalk with the back of a knife (white in color). Finely slice the white portion, discarding the green stalk.

Using a mortar and pestle, finely pound the dry roasted coriander and cumin seeds. Take it out and keep aside in a bowl.

Now pound the galangal and kaffir lime rind until smooth. Add the finely sliced lemon grass and green peppercorn and pound.

When done, add the green chillies, pound well until a smooth paste is formed. Next add the garlic and shallots and pound thoroughly. Finally, add the shrimp paste, sweet basil and pound until the mixture forms a fine paste.

Notes:

  • For a vegetarian version, skip the shrimp paste.
  • Alternatively, you could grind all the ingredients in a food processor instead of using the mortar and pestle. Though, I believe that the aromas and flavors that come out in pounding cannot be replicated by a food processor.

Spicy Tomato Chutney

It was a very special day. Two weeks ago, K, a very close friend, had a beautiful baby girl.

K & I have known each other since high school. Although we spent only 2 years together, the friendship that we shared was one that will be with us for a lifetime.

As little school girls, we would talk endlessly about anything and everything under the sun! I don’t know what inspired us to talk about so much, but we just did. We were always running out of time but never out of conversation.

We had so many things in common, including the guys we liked;-) But, nothing, not even that mattered.

When I left for Bangkok, K & I decided that we’d keep a diary & write about our new lives. This was the pre-internet boom era. Overseas phone calls were simply unaffordable!

Six months later, we exchanged our diaries. When we look back, we laugh about it. As a young girl embarking on a strange new world with no friends in a foreign land, that diary was the only friend I had for many months.

Two decades later, I am on the phone with her again. It is the night before she is due to be admitted in the hospital for her baby’s delivery. She is anxious about one of the most important milestones in her life – just how I was was on the night before V was born. Emotions flow. As we continue talking, I know that of all the conversations we have had since I have known her, this one will be etched in our memories forever. I know that tomorrow the moon will  be a little bigger, a little rounder, a little shinier, to welcome the most beautiful baby to this world…

Moving on to today’s recipe..

Spicy Tomato Chutney:

A flavorful Chutney made by roasting tomatoes, ginger and garlic together and spicing it up with chillies (fresh and dry) along with other spices.

To print this recipe, click here.

Ingredients:

For roasting:
450 gms tomatoes (roughly 5 medium – big tomatoes)
Garlic: 5 cloves
Ginger: thick 1 inch pc
Mustard oil: a drizzle for roasting

Other ingredients:
2 dried red chillies: roasted in a pan until the outside is dark (about 3-4 mins) – use only 1 if you don’t want it to be too spicy.
Fresh green chillies: 3 (use less if you don’t want it to be too spicy).
Coriander leaves: chopped 1 1/2 – 2 cups
Onion: 1 cup chopped (roughly 1 medium sized)
1 tsp of roasted cumin powder
Lemon juice: 1 tbsp
Mustard oil: 1 tbsp to add to the chutney
Black salt: ½ tsp
Regular Salt: to taste.

How I did it:

  • Pre-heat oven at 250 deg for 15 mins.
  • Roast the tomatoes, ginger and garlic with a drizzle of mustard oil in the oven at 250 deg or higher for 20 mins until the tomatoes start to turn brown-black.

  • Dry roast the dried red chillies on medium-low heat in a pan (3-4 mins), stirring continuously. It should get darker. Once it cools, roughly break the dry red chillies with your finger tips into smaller pcs.
  • When the tomatoes are done, remove the skin of the tomatoes. Mash the tomatoes and the garlic with the back of a spoon/fork. Chop the roasted ginger. Add to the mashed tomatoes & garlic.
  • Next, add all the remaining ingredients listed above including the dry red chillies prepared above.
  • Combine everything with a spoon. Spicy Tomato Chutney is ready.

Enjoy this Spicy Tomato Chutney as a side with Roti and Jungli Mutton or as a side with any other meal.

For a less spicy Chutney:
The green chillies & red chillies in the proportion used make it very spicy and I love it this way. If you don’t like spicy food, tone down the chillies or remove the seeds first before adding them. Use 1 dry red chilli and 1 green chilli.

Spiced Raw Banana or Plantain Kofta | ..and a cup of joy!

Hello World!

Last week, my post on Avocado Chutney got Freshly Pressed! I was overjoyed and anxious, all at the same time. For all of you who visited this space and liked what they read, a BIG Thank You and a warm welcome!:-)

Starbucks: a cup of joy & a hint of guilt

I am not employed by Starbucks nor related to them in any form, living or dead. These are the personal views of someone who has spent a lot of guilt $ here over the past decade.

I know there are lots of people out there who’ll probably stop reading this post right about now as they are about to realize: I  ♥ my latte! What’s the fuss about anyway? Could it be that extra buck I spend here vs. the not-so-glitzy local café? Or is it that bright smile from the lady over the counter at 9 am, when you wish you were in your pajamas snoozing but you’ve just about managed to drag yourself to work? Or that extra attention you get when they know exactly what you want from a mile away?  Perhaps, the warm and earthy ambiance draws me to itself, giving me a dreamy sense of ‘coffee in the woods’. Or their effort to more than make up for something they’ve grossly messed up! I don’t have the answer, but there’s something about that cozy space which gives me a cup of joy!

I am not all that naive. I do a reality check every now and then. The verdict is out. One latte a week. Two, if I’ve done a good deed during the week.

But, how do I avoid the other twenty seven times I see the twin-tailed mermaid looking back at me? Inviting me for my cup of joy? I am determined. But, as days go by, my determination fades. I miss the Siren and the warmth and joy she brings…

I give in.

And history repeats itself… 🙂

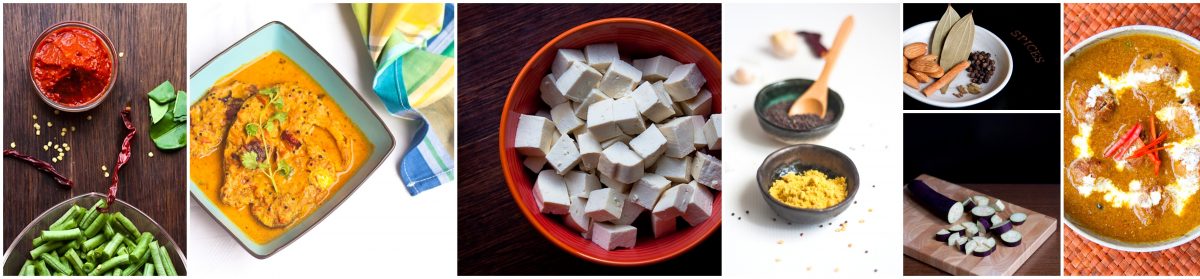
Today’s recipe is a traditional recipe made in many homes across India – mainly in the states of Bihar, Orissa and West Bengal. I have made a couple of versions of this curry at home but this is my favorite! Raw Bananas / Plantains are boiled, mixed with spices, and made into table-tennis ball like shapes which are then deep-fried (known as kofta). Alternatively, they can be made into patties for a less-oil version. The curry is made with a combination of onion, tomato, ginger, garlic and dry spices together with almond paste for a subtle sweetness. The koftas are then soaked in the curry and with a little garnish, this dish is all yours to enjoy.

Raw Bananas and Plantains are used interchangeably by many. Both belong to the Banana family, though plantains are generally tougher and therefore take a little longer (up to 10 mins extra) to boil. I have used both and both work just fine.

Spiced Raw Banana Kofta (Kache Kele ka Kofta / Kachkolar Kofta):

For a printer-friendly version of this recipe, click  here.

There are 3 steps to this recipe –:

I – Raw Banana / Plantain balls (koftas) OR raw banana patties/tikkis – The choice is YOURS!
II – Preparing the Curry
III – Serving this dish

Serves: 4
(Makes about 10-12 koftas/tikkis/patties)

Step I – Raw Banana / Plantain Koftas / Patties:

Ingredients:

(Makes 10-12 pcs)

Raw banana or Plantain – 2 pcs
Potato – 1 small-medium sized
Onion: 3/4 cup, finely chopped
Ginger: Grated 1 tbsp
Green chillies: 2 – chopped fine (adjust to your own spice tolerance level)
Chilli powder: 1/4 tsp
Turmeric powder : 1/2 tsp
Aamchoor powder: 1 tsp (available in Indian stores)
Coriander powder: ½ tsp
Cumin powder: ½ tsp
Salt: to taste
Regular cooking oil: for deep frying koftas (a lot!) OR pan-frying patties/tikkis (2-3 tblsp in a non-stick pan)

How I did it:

  • Cut each raw banana or plantain into 3 pcs – roughly 1.5″ – 2″ per pc, with the skin intact. Throw away the edges.
  • Boil the raw bananas in a pot of water, almost covered with water. Add 1/4 tsp turmeric while boiling. Cover and let it boil on low-medium heat until done. Boil for approximately 25 mins and check. Pierce with a fork to check if it has softened. When it’s done, the fork should go through easily.

Plantain usually takes about 35-40 mins to boil as they are tougher whereas medium sized raw bananas should be done in 30 mins. They should be cooked soft but not mushy / overcooked.

  • When done, run it through tap water so that it cools down. Remove skin. It should come off very easily.
  • Meanwhile, boil 1 potato. Peel and keep it aside.
  • In a deep bowl, mash the raw bananas using your fingers or a spoon. Add the boiled potato and mash it too. Ensure it is mashed well.
  • Add all the remaining ingredients and combine together.

I love this dish and can’t wait for an occasion to have it! At the same time, the koftas are traditionally deep fried and that doesn’t suit my every day cooking. So, I make patties when I have it for regular meals. On special occasions, I make the deep fried koftas.

For Koftas:

  • To make the koftas, take table tennis ball sized portions of the above mixture in your palm. Give it an even round shape. Depending on the size of the bananas / plantains used, you can easily come up with 10-12 pcs.
  • Next, heat sufficient oil in a deep dish or kadhai to deep-fry the koftas.

Make sure the oil is hot before you start frying. You may need to heat the oil on medium heat for up to 2 mins. Put only 1 pc at first to make sure the koftas don’t break while frying. If you feel that the banana mixture is too mushy, you can add 1-2 tbsp of besan (chickpea flour) in the mixture to bind it. To avoid the koftas from sticking to one another, space out putting the koftas by 30 seconds so that they are a little fried before the next one comes in. Do not overcrowd the kadhai / frying pan.

For Patties (Tikkis):

  • To make raw banana patties, take the same portion of the banana mixture as for the kofta (a table tennis ball size). Make a nice round at first and flatten it. Use your palm and fingers to give it an even patty-like shape.
  • In a non-stick pan, heat 2-3 tblsp of oil. Add the patties and let it cook on low heat until cooked. Turn over to make sure it is cooked / browned on both sides

This can also be served as an appetizer along with some coriander & mint chutney. I’ll leave the chutney recipe for another day.

Step II – Preparing the Curry:

Ingredients:

Cinnamon : 1 thin stick
Bay leaves: 2 small
Cardamom: 2-3 (pods only)
Whole black pepper: 6
Any cooking oil: 2 tblsp
Almonds: 7-8 pcs soaked for at least 10 mins in hot water. Remove skin. Add a little bit of water to grind to a thick but smooth paste.
Onion: 1 cup – Finely  chopped (1 medium sized)
Ginger paste: 1 tblsp
Garlic paste: 1 tblsp
Tomatoes: 1 medium sized – Ground to a paste.
Green chillies – 2 whole (optional)
Salt: to taste

In a bowl, make a thick paste of the following dry spices by adding very little water:
Coriander powder: ½ tsp
Cumin powder: 1/2 tsp
Turmeric powder: 1/4 tsp
Chilli powder (optional): 1/4 tsp

How I did it :

  • Heat oil in a heavy bottomed pan/kadhai. Add cinnamon sticks, bay leaves, cardamom pods and whole black pepper. Fry for about 30-40 secs on low heat, stirring occasionally.
  • Add chopped onions. Fry on low-medium heat until brownish.
  • Add ginger and garlic paste. Fry for another 1-2 mins, until combined well. If it starts to stick on the bottom, sprinkle a little bit of water and scrape it off, blending it into the masala.
  • Add the thick spice paste prepared with coriander powder, cumin powder, turmeric & chilli. Continue frying for another 2 mins.
  • Add the tomato paste and salt. Fry until the tomatoes are fully cooked and the masala becomes a lumpy mass, darker in color than how it started. It should also look glossy as the oil starts to surface on the masala. (approx 12 mins on low heat).
  • Add the almond paste and continue for another 5 mins. The almond paste should have combined well with the rest of the masalas and the favors integrated well to make our curry.
  • Once you have achieved that, add about 400 ml of water (preferably, boiling water as it speeds up the cooking process). Once the curry starts boiling, cover and let it boil on low-medium heat for another 10 mins, stirring occasionally. Check for salt and spices. At this point, you can add the whole green chillies, if you wish. The curry should be thicker in consistency at the end of this process.
  • Turn off the heat.

Step III – Serving this dish:

Ingredients for Garnishing:

Red chillies: 1. Remove seeds and cut in thin strips
Fresh cream: 2-3 tsp
OR
Coriander leaves chopped: a handful

How I did it:

    • Start preparing to serve this dish about 10-15 mins prior to actual serving. Use a serving dish that is flat so that the koftas can be placed without overcrowding.
    • In the serving dish, place the koftas/tikkis/patties.
    • Heat the curry prepared above to make sure it is piping hot! Turn off the heat.
    • Pour the hot curry over the kofta. Be careful not to spill over as the curry should be very hot at this point. Make sure that the koftas are almost submerged in the curry. Let the koftas soak for at least 10-15 mins, covered.
    • If you find the dish is not warm enough when you are ready to eat, microwave it for 1-2 mins immediately after soaking.
    • Once the soaking is complete, garnish with fresh cream and thin strips of de-seeded red chillies. Alternatively, you could garnish with chopped coriander leaves.
    • Enjoy the koftas with steamed rice.

Too little soaking and the curry doesn’t go inside the koftas. Too much soaking and you’ll have very crumbly koftas. Therefore, the process of serving this dish is very important to make sure you serve the the koftas that you’ve worked so hard to make!

If the bananas were boiled nice and soft, soak them for 10 mins before serving. If bananas feel hard after you’ve mashed and made your koftas, soak for up to 20 mins before serving.

To a refreshing 2012: Avocado Chutney

After a 3-month hiatus, I am back to the blogosphere with plenty of good wishes for a belated but very Happy & refreshing 2012 to all. I hope the year has been good so far and you are looking forward to the rest of the year.

In the beginning of the year, a friend said that 2012 is a year of change. I made fun of him then, but I get a feeling – he is going to be right.

For me, 2012 kicked off in a memorable way. V started school this year. Play school – but a school nevertheless. He was excited about going to school and that was a good sign. I really didn’t expect him to be shy. I was more worried about the other kids as my little one can be too friendly at times and this goes beyond the social norms of what is acceptable as friendly. How do you teach your little ones to behave in the most “adult” like ways. Shake hands (don’t hug someone you just met 5 minutes ago… because that’s socially frowned upon). At the same time, we hug our kids at every opportunity we get. I tell him not to give instructions to other kids (the poor guy is just doing what he is told) because we should let other people be & honestly because it’s not what is expected of a kid his age. Other kids have their own parents to instruct them! Ironical, isn’t it?

I often wonder about the true meaning of the word ‘parenting’. I wish it were as simple as providing the best environment for our kids to turn out to be the smartest in every sphere of life – it is not. Is it us trying to be good parents or is it our kids teaching us how to be good parents – instinctively through their innocence? They inspire us to introspect. They make us want to be a better person – someone they will feel proud to have as their Parent.

It goes beyond the relationship shared between our children and us. It is also a constant reminder of our parents’ journey to get us to where we are today…

Leaving you with that thought and looking forward to your views, it’s time to talk about the refreshing Avocado chutney.

This one doesn’t have a very long history. When we were growing up in India, Avocado was something I’d never seen or heard of. However, I am told that it is readily available now, at least in the metros. This version of the chutney originated in my big sis’ home in Vancouver & it’s traveled a long way since. It’s been shared with friends and has become a part of their daily meals as well.

For a printer-friendly version of this recipe, click here.

Serves: 4-5

Ingredients:

Avocado: 2 (approx 300 gms)
Onion: ½ medium sized finely chopped
Ginger: 1 tsp (optional)
Garlic: 1/2 tsp (optional)
Green chillies: 2-3 finely chopped
Coriander leaves: 2 heaped tbsp chopped
Lime juice: 1 ½ tbsp
Roasted cumin powder: ½ tsp
Salt: to taste
Mustard oil: 1 tsp (can be replaced with Olive oil)

How I did it:

When you buy avocado from the market, you will most likely need to leave it outside the fridge for 2-3 days to ripen. This ensures that the avocado is soft and easy to mash. You can feel the softness by pressing on the outside. Once it is ripe, store it in the fridge. As a word of caution, do not leave it out for too long !

Now cut the avocado from the middle, as shown in the picture. Pull out the halves by twisting the 2 halves in opposite direction. Next, scoop the avocado out from the skin using a spoon. If the avocado is ripe, it will come off quite clean.

Using the back of a fork, mash the avocado in a bowl. I have used a blender to do this job but I prefer using the fork because the pulp is so soft that blending in makes it into a paste. I like its buttery and nutty texture and using a fork preserves that texture.

Now add the chopped onions, ginger, garlic, chillies, coriander leaves, roasted cumin powder and salt.

Finish it with lime juice and a drizzle of mustard oil for that extra zing! Mix all the ingredients with a spoon. Adjust the seasoning as per your taste.

Notes:

  • Avocado tends to brown very quickly and lime juice helps to maintain it’s vibrant color. Prepare this dish closer to the time when you want to eat it or the avocado may turn brown.
  • I like the taste of raw ginger and garlic in the above proportions. If you do not like the taste of raw ginger or garlic, you can skip it or alter the proportions.
  • If you do not like the flavor of mustard oil, use olive oil instead. I used olive oil for my little one when he was younger. Now he’s gotten used to the flavor of mustard oil too 😉

Enjoy it as a side with any meal!