Cooking in the backyard: Thai style Tuna Fried Rice

IMG_7698

Thailand, a country full of little family-owned café’s. These little café’s are usually set in a comforting, home-style environment. Here you’ll experience what I call ‘cooking in the backyard’. It is also how a lot of traditional homes are designed with a wet kitchen in the backyard. You’ll often see the young school going teenager lending a helping hand to his or her parents. During rush hour, the kids even help with the cooking. It’s inspiring to see these young chefs cook with such exuberating confidence.

IMG_7718

I stand there watching, as the man on my side of the counter passes a white slip over to the Cook. The Cook, a lady probably in her late 40s, has a very pleasant disposition. She smiles at me as she gently heats up the wok while taking a quick glance at the white slip of paper. She’s probably done it a thousand times over and over again. She looks like she could do this with her eyes closed.

As the wok heats up, she takes some garlic and chillies and gently pounds them using a mortar and pestle. The mortar and pestle is always by her side. She is extremely organised with each ingredient placed less than an arms distance away, just where it should be. She always has a big icebox next to her where all the chilled meat is kept. She opens it just a bit, takes out the required portion of the meat and closes it again until the next order comes in.

IMG_7703

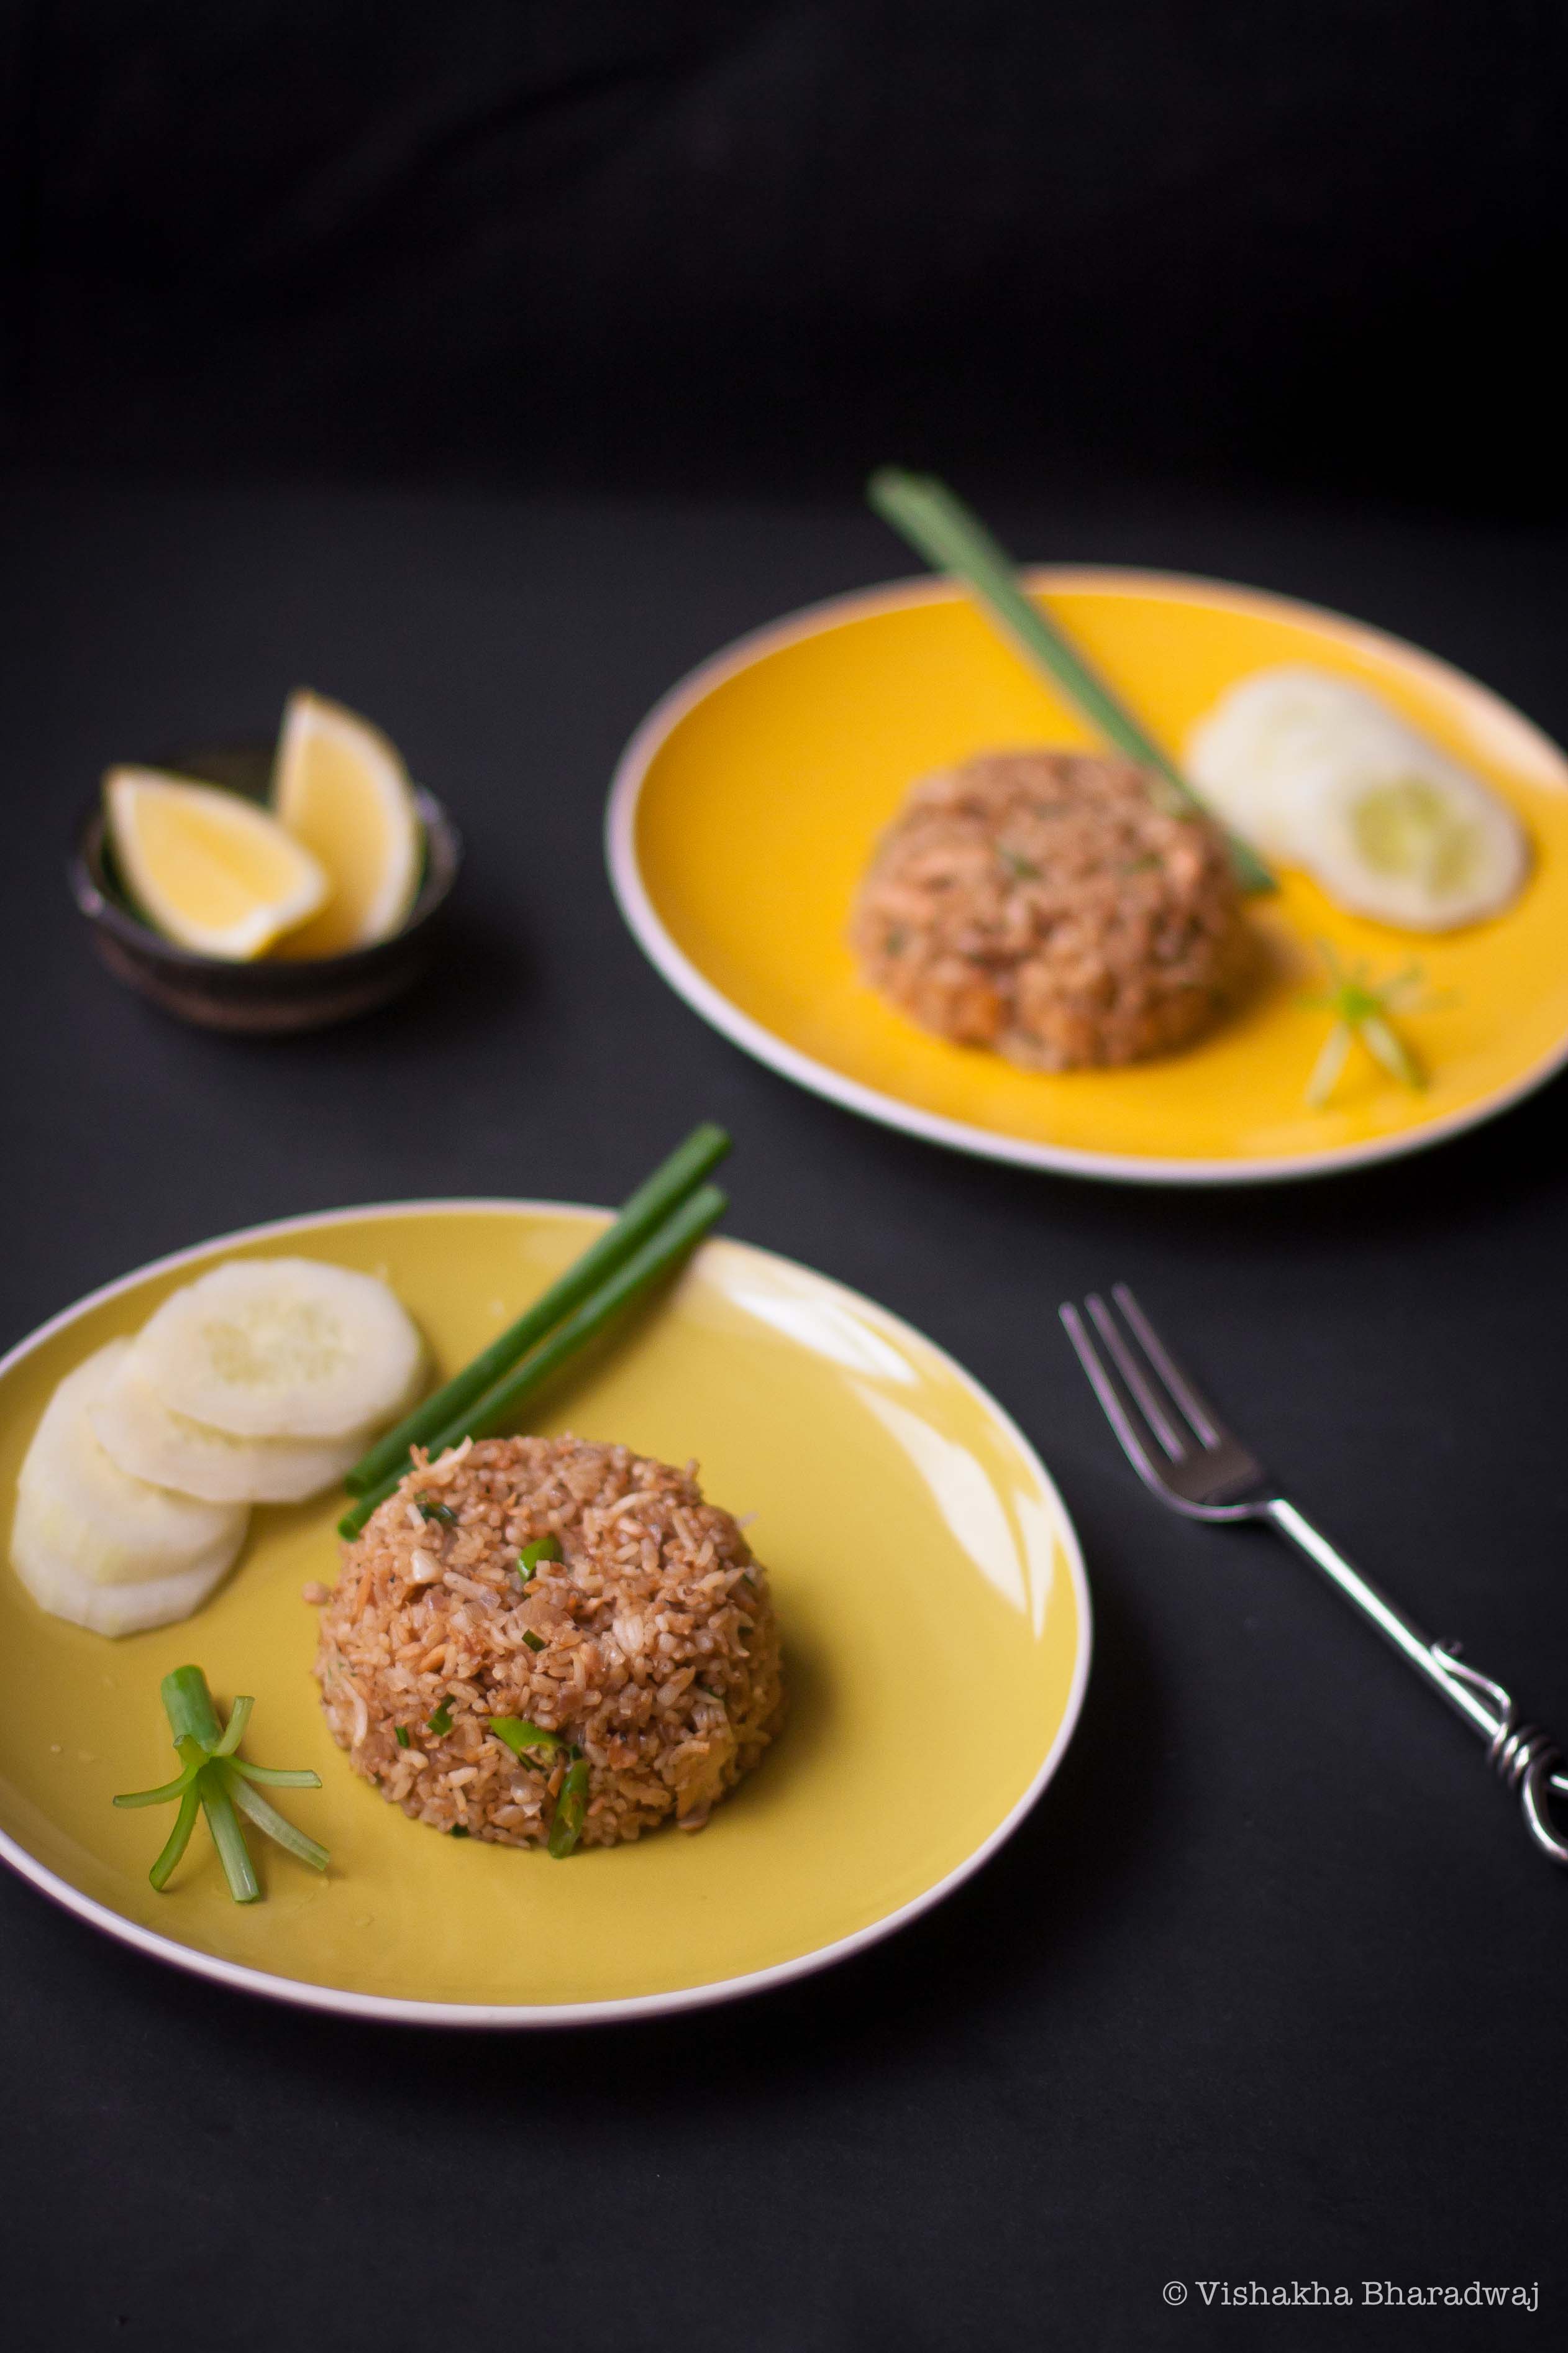
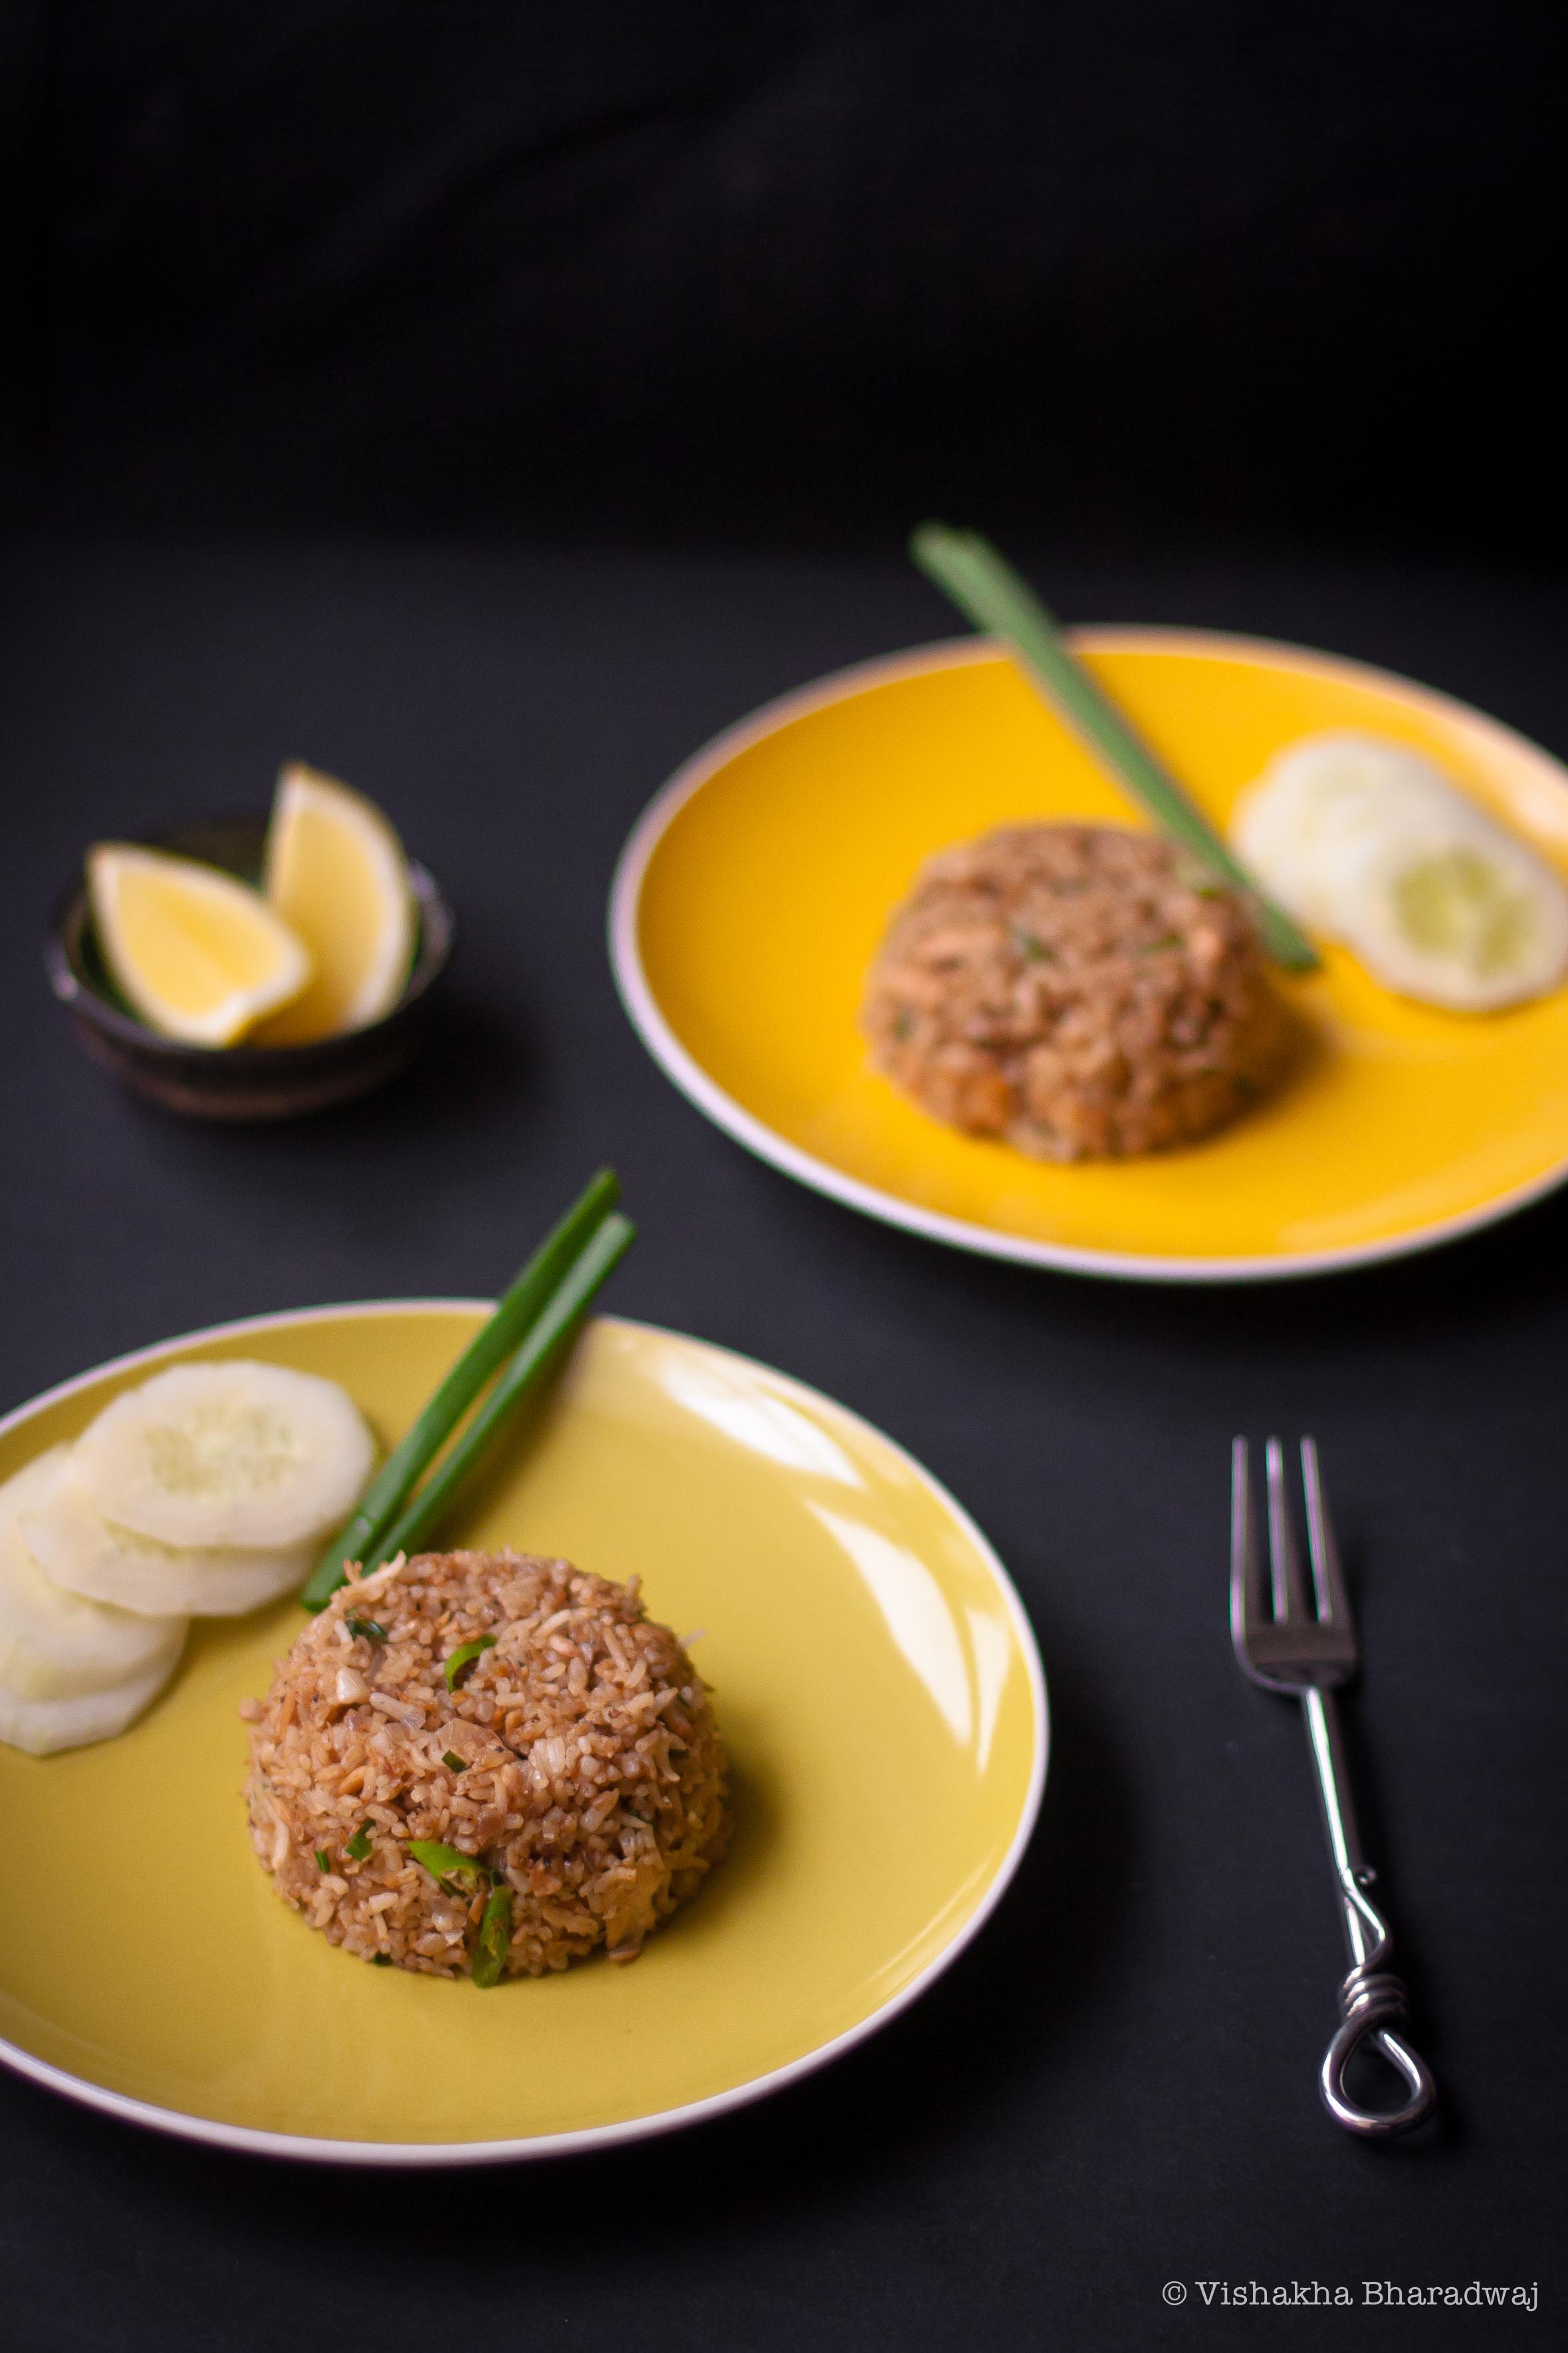
An artist in her own right, she knows how to play with her tools – the mortar and pestle, the wok, the ladle and the fire. She uses the fish sauce, sugar, soya sauce, pepper and other herbs and spices to tell her story. She fires up the wok, turning and tossing the ingredients, adding them one after the other, all in good time, adjusting the heat as she deems appropriate. Within minutes, she creates food that is a treat to all your senses. A modest melamine plate in basic white, with or without patterns is placed right next to her. She plates her food and places a few slices of cucumber and a slice of lime, all in such an artistic manner.

IMG_7706

As the plate makes its journey from the wok to my table, my eyes see the color coordination including the Thai green chillies and the freshness of the lime. As it is placed in front of me, I get the smoky aroma that creates a suspense that I want to unfold, almost immediately. As I take the first bite, I know it has touched all my senses and a memory has just been formed.

 As the lady moves on to the next white slip where the orders are scribbled, a quick rinse and a scrub is all it takes to have her Wok ready to create the same brilliance all over again for the next waiting customer.

IMG_7701

Here is my version of a Thai style Tuna Fried Rice, a dish I had for many lunches during the years that I lived in Thailand.

For the printed recipe, click here.

Serves: 3

Ingredients:

Pre-cooked and cooled Thai Rice (preferably cooked the night before): 2 ½ cups
Red Onion: 1 Cup finely chopped
Thai Green chillies: 4-5, chopped fine (This makes it very spicy, adjust to your own tolerance)
Garlic, lightly pounded: 3 cloves
Olive Oil: 1 tbsp
Canned Tuna flakes in EVOO (use any other similar variety): 150 gms, oil drained.
Spring onions (Scallions), finely chopped (green parts): ¼ cup
Fish sauce: 1 Tbsp
Dark soya sauce: 1 tsp
Worcestershire sauce: 2 tsp
Black Pepper powder (coarsely powdered): ¼ tsp (or adjust to taste)
Salt: a pinch

IMG_7711

How I did it:

  1. The rice needs to be precooked and cold. This is important to ensure the grains of rice are separate and not lumpy when making the fried rice. When cooking the rice for fried rice, put a little less water than you would do normally.
  2. Heat a wok. When the wok is hot, add oil to it.
  3. Add the lightly pounded garlic. Reduce the fire and let the garlic cook for a few seconds without getting burnt. Add the chopped onions and green chillies. Let it soften while stirring continuously. Onions will change colour to a beautiful pink. Approx 3 mins on low heat.
  4. When the onions turn pink, add the cold and precooked rice and a tiny pinch of salt and increase the heat to high. Using the back of a ladle/spatula, push the rice towards the centre of the wok, removing any lumps while mixing it with the onions.
  5. Now add the tuna followed by all the sauces and the black pepper powder. Bring it together on high heat.
  6. Add the chopped spring onions. Give it one last good stir and serve it immediately with some sliced cucumbers and wedges of lime.

Collages30

Notes:

–        Fish sauce is quite salty. I would suggest that you add half the quantity of fish sauce first and adjust the taste as per your liking.
–        In my opinion, a fried rice cannot have the same texture and taste if it’s cooked with freshly cooked or hot rice. Therefore, try to cook the rice at least a few hours in advance.
–        If you don’t have spring onions, replace it with some finely chopped fresh coriander leaves or cilantro. That little bit of green is essential to provide a little freshness to this simple fried rice.
–        I had to cook for my 4 year old son, so I added the green chillies right in the end. If not, I would have added them together with the onions, or lightly pound them together with the garlic in the very beginning. Go ahead and do whatever suits your situation. If you are making this for kids, omit the green chillies.

Advertisement

Crispy Salmon with Garlic Coriander sauce

Crispy Salmon with Garlic Coriander Sauce

There are 2 kinds of people in this world: Those that love Salmon. And those that don’t. That’s probably true of most things, but I couldn’t come up with a better opening line. So, there you go!

I happen to be the former and so is little V. I hereby declare my eternal love for Salmon. R, on the other hand, doesn’t quite get what the fuss is all about! But we [V and I] find a way to work around it. We just make him eat it. 😉 And he does.

We especially love the crisp skin of the Salmon. The skin absorbs a bit more salt than the rest of the fish and that makes it even more desirable. When there’s Salmon on the dinner table, all else doesn’t quite matter, does it? 🙂

I have made this countless number of times for V and it’s quick and easy to make. If you are a Salmon lover like me, I won’t need to sell the recipe to you because you will probably love it anyway 🙂

In it’s simplest form, all you need is some crushed garlic, salt, pepper and olive oil marinade with the salmon. Pan fry (with minimal oil) and you are done. In this version, I added a slight variant – fresh coriander leaves or cilantro. If you have a particular dislike for coriander, feel free to omit the coriander leaves.

We usually have this Crispy Salmon for dinner on a weeknight when I don’t want to spend too much time cooking. This goes well with a simple vegetable pasta or just plain rice and stir fried vegetables.

To print the recipe, click here.

Crispy Salmon with garlic coriander sauce

Serves: 2
Total time taken: Under 30 minutes
Preparation time: 20 minutes
Cooking time: 7-8 minutes

Ingredients:
Salmon fillet with skin on (about 250 gms)
Garlic cloves: 1-2 (adjust to taste)
Fresh coriander leaves – a bunch. Discard the roots.
Black pepper powder: a tiny pinch
Juice of ¼ of a lemon
Zest of ½ a lemon
Olive oil: 1 tbsp
Sea salt: to taste

How I did it:

1. Squeeze the lemon juice and zest on the salmon fillet. Sprinkle sea salt to taste. Put a little less than required as we will also season the sauce.

2. Prepare a quick blend of the garlic, coriander leaves including stalk but not the roots, a tsp of olive oil and sea salt.

Preparing the garlic-coriander sauce.

3. Rub the prepared coriander, garlic sauce (the marinade) on the salmon. Sprinkle a dash of black pepper powder. Let the Salmon marinate for about 15 minutes.

Rub the Marinade on the salmon.

4. Heat a pan. Add the remaining olive oil (2 tsp). Make sure the the oil is hot before placing the salmon fillet in it. This step is important to prevent the fish from breaking and disintegrating.

5. Place the salmon fillet, skin down first. Reduce flame to lowest. Cover and let it cook for 5 minutes.

Heat a pan. Add olive oil and place the marinated Salmon, skin down. Cover & let it cook for 5 minutes.

6. After 5 minutes, turn the salmon for another minute. Do not cook on this side for long as the salmon will start to overcook.

Turn the Salmon over and cook for another minute.

7. Serve w lemon wedges.

Crispy Salmon with Garlic Coriander Sauce

Maithan : the birth of Laksa leaves Pakoras with Spicy Coriander and Mint Chutney

A trip back home is synonymous to meeting relatives and a gastronomical treat that is limited only by your own will power. Our last trip home was essentially that.

While in Kolkata, we spent a weekend at Maithan (or Maithon). With an open mind and no expectations, we set out on a train journey to Kumardhobi, followed by a 25-minutes autorickshaw ride to Maithan. The first half of the auto ride was bumpy and gave you a quick glimpse of rural India.  It transformed almost seamlessly into one of the finer roads in India. Soon, we were on the Damodar Valley Dam which is built on the Barakar river, a tributary of the Damodar river.

We stayed in ‘Mazumdar Niwas’ a guest house for DVC (Damodar Valley Corp.) guests. The guest house is in a small island in the lake which is formed as a result of the dam. A short walkway connects the guest house to the mainland. The view from the guest house is nothing less than spectacular and undoubtedly the best in Maithan.

Maithan means (Mai-Than or Ma ka Than or Mother’s abode). It is in Jharkhand and borders West Bengal. It’s a very popular picnic spot for people living in nearby areas. One can spot them from a distance as you see and hear bus loads of people and blaring music from time to time. Unfortunately, the wastes that are left behind after these picnics, ruin the otherwise beautiful neighborhood. For more information on Maithan, you can visit here or here.

Maithan is a very small place and a weekend is sufficient to do any sight seeing here. I highly recommend a 2-hour boat ride in the lake. The best time to go is around 3pm in order to witness the brilliant colors of the sky as the sun sets over the lake.

Our daily meals were very simple, mostly at the guest house or at a nearby hotel. There isn’t much to mention in that respect, except of course, one place: the inspiration behind today’s post.

The pakoras or fritters (more about Pakora here) made by a small family-run shop, located at the main entrance of Mazumdar Niwas are simply sensational ! The place is run by a very humble gentleman, Mr. Chitto Ranjan Debnath, together with his wife and their son. You will find a variety of pakoras made with onions, cottage cheese and potatoes, amongst other things. I fell in love with these pakoras at the first bite – perfectly soft in the inside and crisp on the outside. Mrs. Debnath kneads the dough with her magical fingers and Mr. Debnath fries them into a golden crisp texture – creating something totally extraordinary! Their warm hospitality only contributes to making this experience a memorable one.

I was so inspired by it that ever since that trip, I have tried to make pakoras in many different ways at home. Of course, to have the best, you need to visit Mr. Debnath’s shop in Maithan 🙂

Pakoras with a unique blend of Indian and South-East Asian flavors – Pakoras flavored with laksa leaves (Daun Laksa or Rau Ram or Polygonum Odoratum).

Laksa leaves are used as garnish for Laksa, a very popular Singapore noodles. These herbs are also eaten fresh in some Vietnamese and Thai salads and used to flavour soups and stir fries. Laksa leaves have a penetrating smell with a citrus note and a refreshing, hot, biting, peppery after taste. In my opinion, fresh laksa leaves have an uncanny similarity in taste to Paan or betel leaves.

Laksa leaves and Spinach Pakoras Recipe:

Though the Debnath family shop served it with a garlic chutney, I enjoy these pakoras with a spicy Coriander & Mint chutney.

To print the Pakora recipe, click here.

Makes about 40 bite-sized pakoras.

Ingredients:

Besan (Gram flour): ¾ cup
Baking powder: 1/8th tsp
Turmeric: ¼ tsp
Chilli powder: ¼ tsp
Salt: ½ tsp regular salt
Black Salt: ¼ tsp
Aamchoor powder (Dried Mango Powder): 1 tsp (Available in Asian/Indian stores)
Water: 2 tbsp
Onion: 1 ½ medium sized, thinly sliced
Ginger: 2 tsp, grated
Garlic: 1 clove grated (equivalent to 1 tsp of grated garlic)
Green chillies: 2-3 finely chopped
Spinach leaves: 1 cup, finely shredded
Fresh Laksa Leaves: ½ cup, finely shredded
Mustard Oil: 1 tbsp for mixing with the batter
Regular oil for deep frying
Chat Masala for sprinkling once the pakoras are fried – a pinch for every batch of 10-15 pakoras (optional)

How I did it:

  • Sieve Besan and Baking powder together.
  • Add all the ingredients in a bowl except the oil for frying and chat masala.
  • Combine all the ingredients together using your fingers. The batter should be sticky enough so that it does not crumble while deep frying later.
  • Let the mixture sit for 15 mins to let the baking powder do it’s job.
  • Heat sufficient oil in a deep wok or kadhai.  Check if the oil is hot by dropping 1 tsp of the batter in the hot oil. If the batter starts sizzling instantly, the oil is hot and ready. Taste it to make sure the seasoning is adequate and per your liking.
  • Use approximately 1 tsp of batter to make the pakoras. Make them in batches of 10 or more depending on the size of the wok / kadhai used.

  • You can either use 2 tsps to give the batter a round shape or the tip of your fingers to drop the pakoras in the hot oil.  The point to remember is each pakora will use roughly 1 tsp of batter.
  • Fry on medium-low heat taking care that the batter is reddish brown but not burnt. Sprinkle a pinch of chat masala over a batch of 10-15 pakoras. (I forgot to do it) Serve immediately.
  • Best enjoyed on a rainy afternoon.. With coriander and mint chutney and a hot cup of tea.

Variations: You can also make these pakoras by omitting the laksa leaves, if you can’t find them and increase the shredded spinach to 1 ½ cups.

Alternatively, omit the Spinach completely by increasing the proportion of onions (use 2 medium sized) with the same proportion of Laksa leaves

Coriander and Mint Chutney Recipe:

To print this recipe, click here.

Makes 3/4 cup Chutney

Ingredients:

For blending:
Fresh Coriander: 1 and ½ cup of roughly chopped coriander leaves. Remove roots and stem.
Mint leaves: 1/2 cup. Pluck mint leaves from the stem. Discard stalk. Use the leaves only.
Ginger: 1” pc
Garlic: 1 clove
Green chillies: 2-3
Mustard oil: 1 ½ tbsp
Water: 2 tbsp

For seasoning:
Salt: ½ tsp
Black salt: ¼ tsp
Lemon juice: 1 tbsp

How I did it:

  • Blend all the ingredients listed above under heading “For blending” until a thick and uniform paste is formed.
  • Take it out in a bowl and add the “for seasoning” ingredients listed above.
  • Combine thoroughly with a spoon.
  • Check for salt / sour taste and adjust as per your liking.

This chutney tastes best when fresh or a maximum of 2-3 days. Make in small batches to always enjoy this chutney at it’s best.

Spicy Tomato Chutney

It was a very special day. Two weeks ago, K, a very close friend, had a beautiful baby girl.

K & I have known each other since high school. Although we spent only 2 years together, the friendship that we shared was one that will be with us for a lifetime.

As little school girls, we would talk endlessly about anything and everything under the sun! I don’t know what inspired us to talk about so much, but we just did. We were always running out of time but never out of conversation.

We had so many things in common, including the guys we liked;-) But, nothing, not even that mattered.

When I left for Bangkok, K & I decided that we’d keep a diary & write about our new lives. This was the pre-internet boom era. Overseas phone calls were simply unaffordable!

Six months later, we exchanged our diaries. When we look back, we laugh about it. As a young girl embarking on a strange new world with no friends in a foreign land, that diary was the only friend I had for many months.

Two decades later, I am on the phone with her again. It is the night before she is due to be admitted in the hospital for her baby’s delivery. She is anxious about one of the most important milestones in her life – just how I was was on the night before V was born. Emotions flow. As we continue talking, I know that of all the conversations we have had since I have known her, this one will be etched in our memories forever. I know that tomorrow the moon will  be a little bigger, a little rounder, a little shinier, to welcome the most beautiful baby to this world…

Moving on to today’s recipe..

Spicy Tomato Chutney:

A flavorful Chutney made by roasting tomatoes, ginger and garlic together and spicing it up with chillies (fresh and dry) along with other spices.

To print this recipe, click here.

Ingredients:

For roasting:
450 gms tomatoes (roughly 5 medium – big tomatoes)
Garlic: 5 cloves
Ginger: thick 1 inch pc
Mustard oil: a drizzle for roasting

Other ingredients:
2 dried red chillies: roasted in a pan until the outside is dark (about 3-4 mins) – use only 1 if you don’t want it to be too spicy.
Fresh green chillies: 3 (use less if you don’t want it to be too spicy).
Coriander leaves: chopped 1 1/2 – 2 cups
Onion: 1 cup chopped (roughly 1 medium sized)
1 tsp of roasted cumin powder
Lemon juice: 1 tbsp
Mustard oil: 1 tbsp to add to the chutney
Black salt: ½ tsp
Regular Salt: to taste.

How I did it:

  • Pre-heat oven at 250 deg for 15 mins.
  • Roast the tomatoes, ginger and garlic with a drizzle of mustard oil in the oven at 250 deg or higher for 20 mins until the tomatoes start to turn brown-black.

  • Dry roast the dried red chillies on medium-low heat in a pan (3-4 mins), stirring continuously. It should get darker. Once it cools, roughly break the dry red chillies with your finger tips into smaller pcs.
  • When the tomatoes are done, remove the skin of the tomatoes. Mash the tomatoes and the garlic with the back of a spoon/fork. Chop the roasted ginger. Add to the mashed tomatoes & garlic.
  • Next, add all the remaining ingredients listed above including the dry red chillies prepared above.
  • Combine everything with a spoon. Spicy Tomato Chutney is ready.

Enjoy this Spicy Tomato Chutney as a side with Roti and Jungli Mutton or as a side with any other meal.

For a less spicy Chutney:
The green chillies & red chillies in the proportion used make it very spicy and I love it this way. If you don’t like spicy food, tone down the chillies or remove the seeds first before adding them. Use 1 dry red chilli and 1 green chilli.