Spicy Sweet-Potato bites!


IMG_7746

One of my earliest memories of sweet potatoes (Shakarkand, Mishti Aaloo or Aluaa) is from my occasional winter visits to my grandmother’s home in Bihar. Sweet potatoes were found in abundance in the winter months. Bonfires made with wood were common in almost every corner / street. Given the lack of heating equipments then, these bonfires were the perfect social setting for some tea, conversations and food along with the much needed warmth for those extremely chilly winter evenings.

2013-08-141

IMG_7750

Sweet potatoes are common food at these casual, unpretentious gatherings. Someone will usually carve out some of the burning amber coloured wood and cover the sweet potatoes in them to let it slow roast. This can take up to an hour to cook. When cooked, the skin becomes very crisp. It is then peeled and dunked in milk with or without sugar and is absolutely delightful for sweet potato lovers. At other times, sweet potatoes are also cooked in the wood fired mud ovens (choolha) that is common in rural India. The other simpler way to cook them is by boiling them in water, peeling them and then seasoning it with some salt and Teesi as part of a regular meal.

If you haven’t grown up with this, you might find the idea strange. R, who spent a number of years in Delhi, finds his peace in roasting and spicing up these tuberous roots. It makes me realize how important it is to try different kinds of food in the early years of life. The food that we eat, especially as children creates memories, forms and shapes how we remember and associate life events and people as we grow up.

I must admit though that I never had a strong liking for sweet potatoes (primarily because of its sweetness) until I became a mother. I strongly believe children should be exposed to different kinds of food from an early age. It helps them to have an open mind about food as they grow up. In practice, I take it as an opportunity to nurture my own creativity in the kitchen and make some interesting meals for the family.

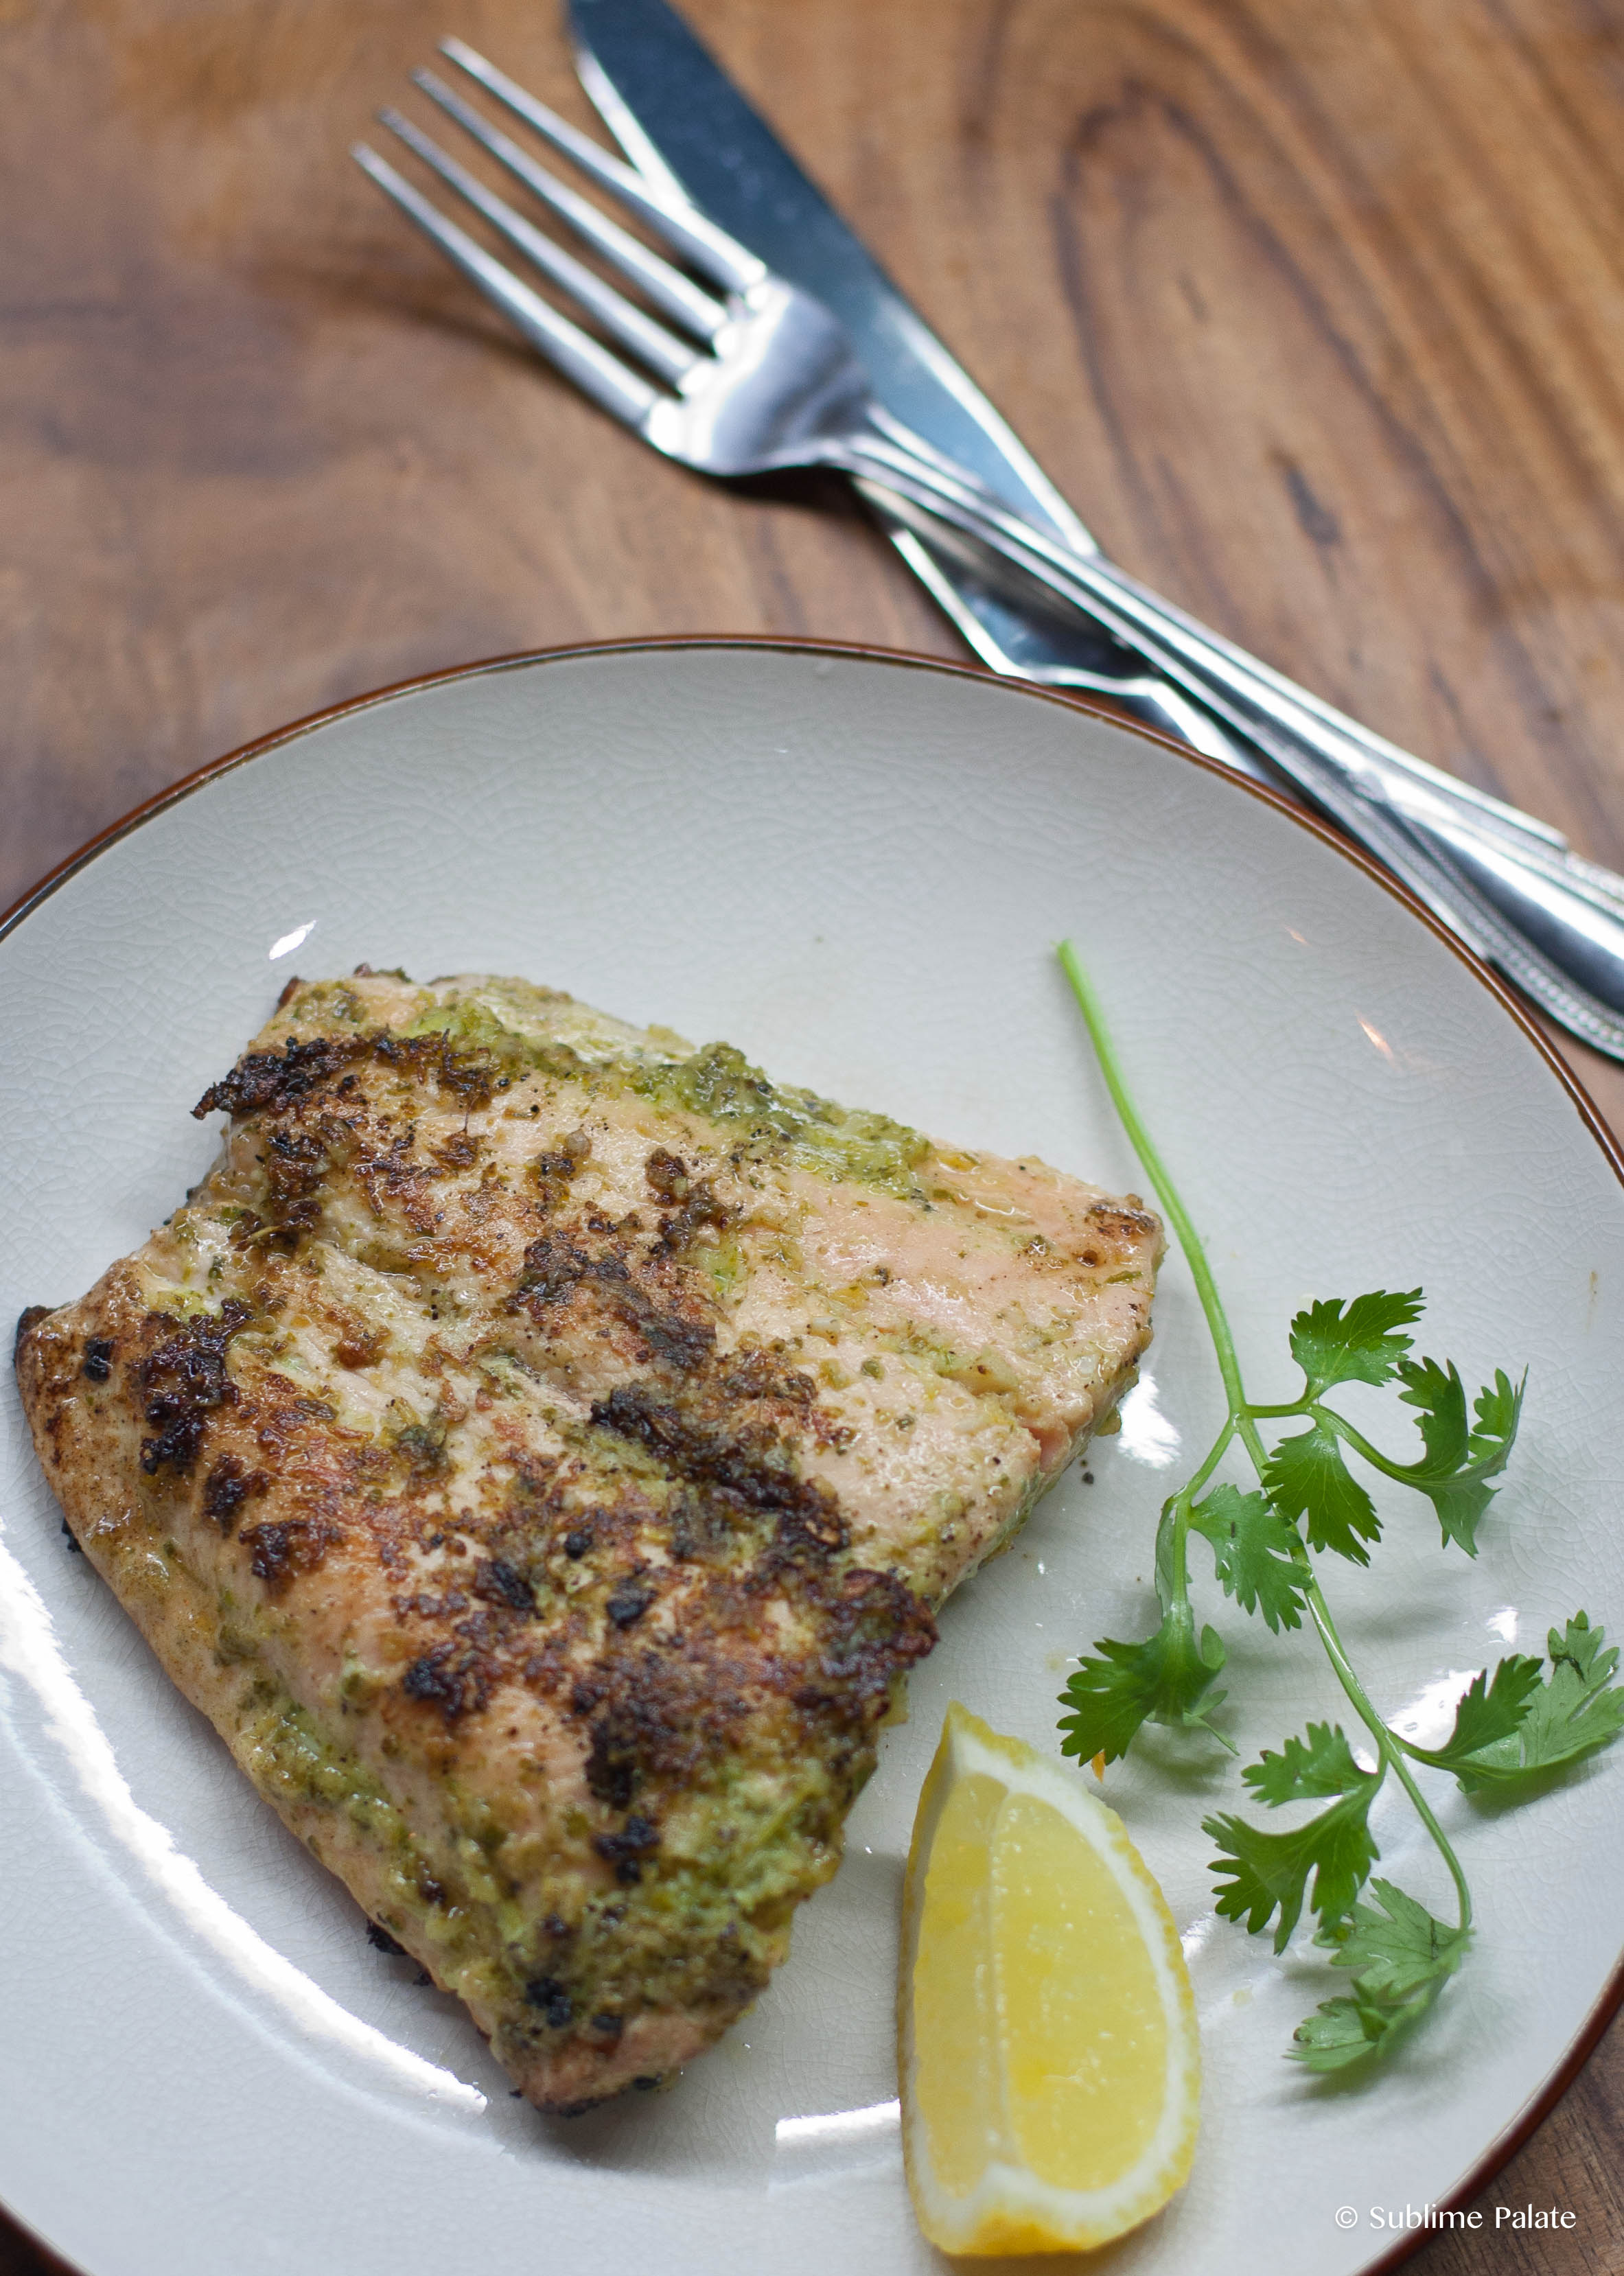
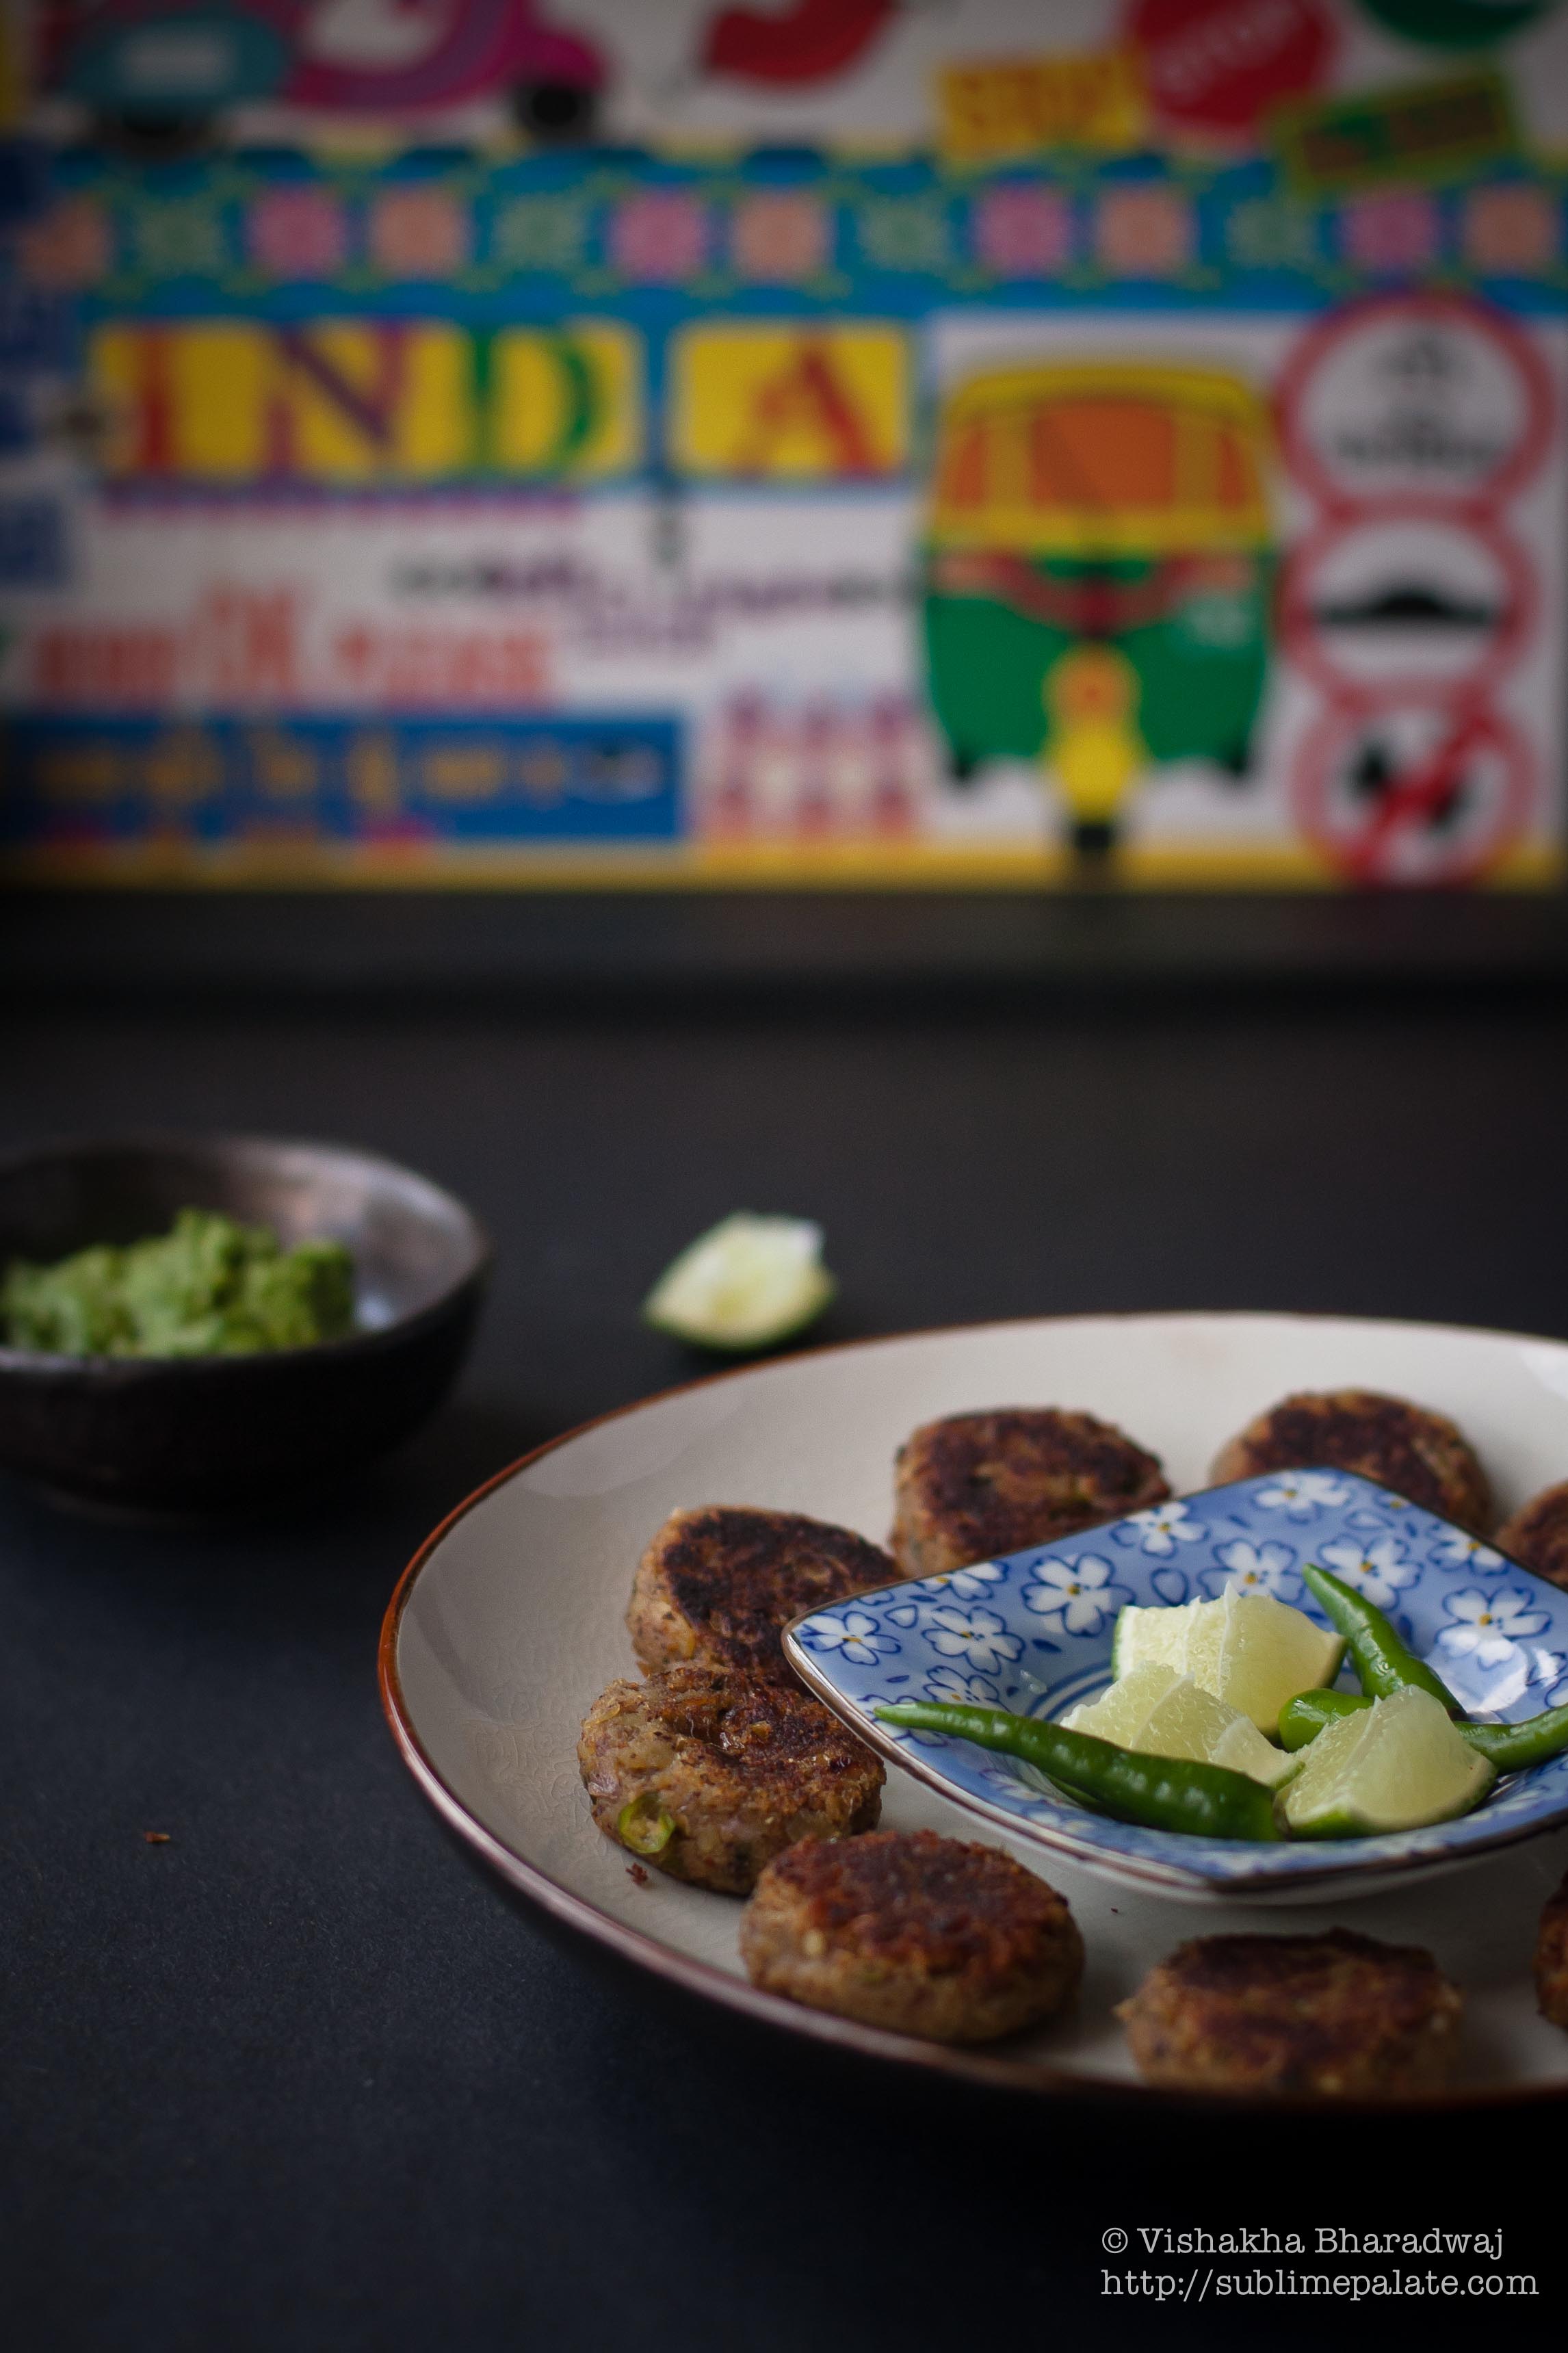
These bite sized cutlets make for a great appetiser to kick start any evening.

IMG_7742

For this recipe, I boiled the sweet potatoes until cooked yet firm. I wanted to create a flavour combination that would tone down the sweetness of the sweet potatoes while incorporating savoury, tangy and heat in the right intensity. The first time I created these was when I was trying to make something new for little V’s snack box. I also wanted to make something that was bite size, just the right size so that he can use his fingers without making it too messy.

To print this recipe, click here.

Yield: About 40 mini / bite size sweet potato cutlets

Ingredients:

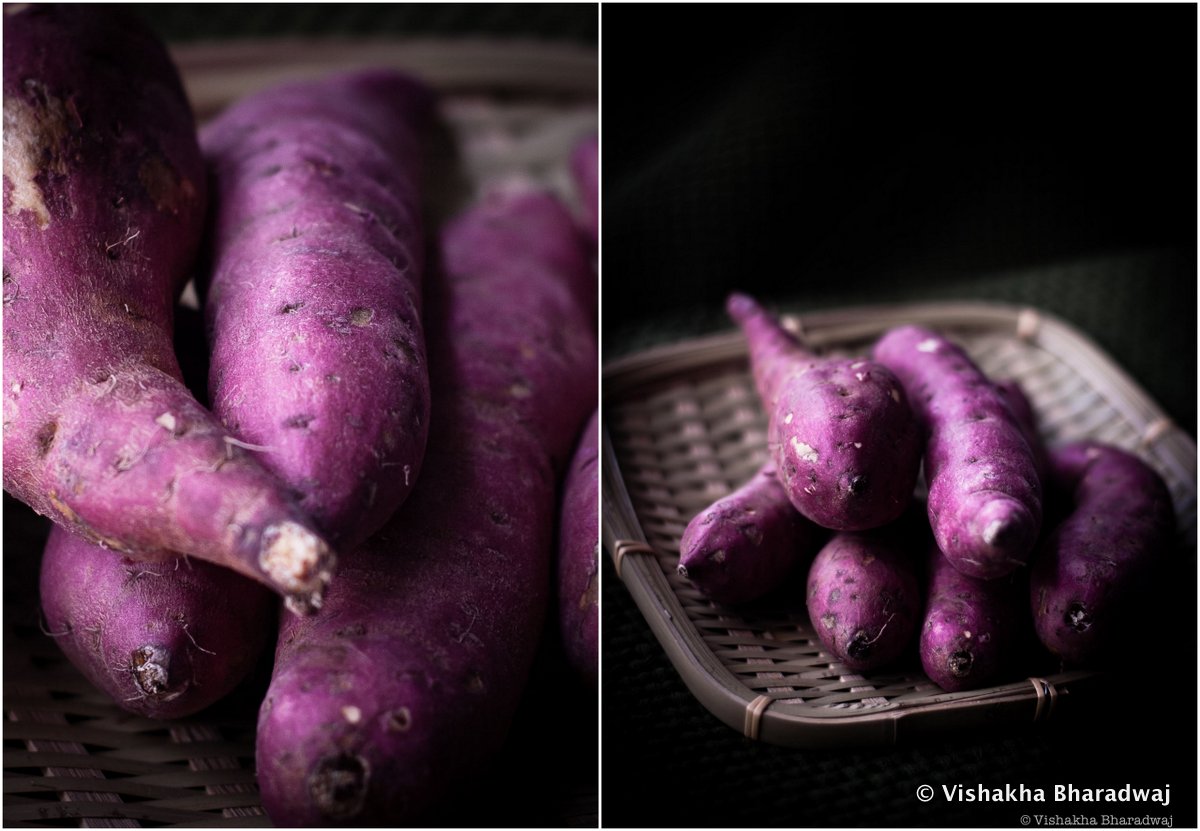
Sweet Potatoes: around 500 gms
Onion: 1 cup, finely chopped
Teesi: 3 Tbsp (See recipe of Teesi here)
Lime juice: 2 Tbsp (start with 1.5 tbsp and adjust to suit your taste)
Coarse Rice powder: 3 Tbsp (you can replace this with fine semolina instead)
Finely chopped coriander leaves: ½ cup
Finely grated ginger: 1 ½ Tbsp
Roasted cumin powder: 1 ½ Tbsp
Chilli powder: 1 tsp
Black pepper powder: 1tsp
Finely chopped green chillies: 4-5 (I used Thai green chillies)
Rock salt: ¼ tsp
Salt: to taste
Ghee to pan fry the mini cutlets (replace with your regular cooking oil if you prefer): You will need to spread a tsp (or less) of ghee in the skillet. As you cook the mini cutlets, you can use an oil brush or the back of a spoon to touch the surface of the cutlets with ghee/oil. When pan frying the next batch, use a little less ghee, just enough to have some oil lining the skillet.

How I did it:

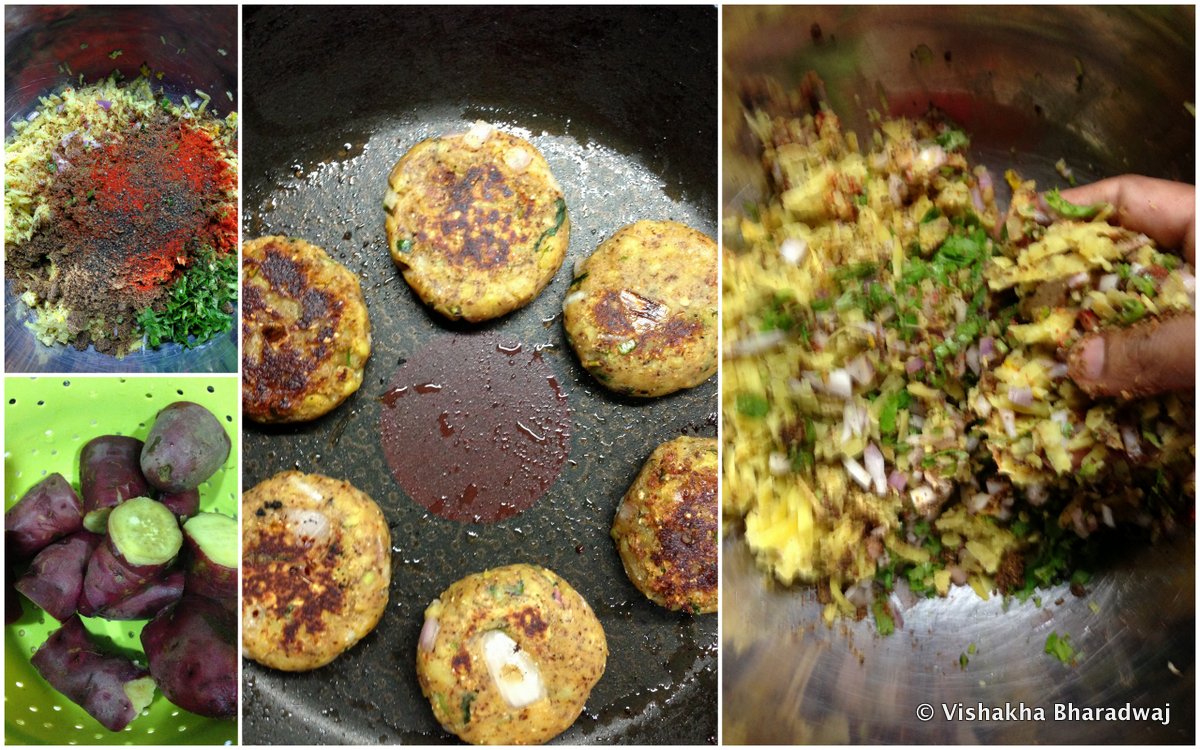
  1. Wash sweet potatoes thoroughly. Slice each sweet potato (skin on) into 2 or 3 big chunks. I used a pressure cooker to boil until steam forms (one whistle). Remove from heat and let it cool down until all the steam is released.
  2. Meanwhile, prepare the other ingredients.
  3. Shock the boiled sweet potatoes in ice cold water. Peel the skin. Grate these into a large enough bowl.
  4. Add all the remaining ingredients listed above.
  5. Using your fingers, mix all the ingredients together making sure the spices (masalas) are uniformly mixed. It doesn’t matter if the sweet potato loses the grated texture. Sweet potatoes have been cooked but are still firm and will retain their texture when we shape them into mini-cutlets. The important thing is to mix this well to ensure every cutlet has the flavours uniformly spread across. Taste and adjust the salt, spice and tangy taste according to your liking. The best way to do this is to pan fry one mini-cutlet first and taste it. I believe the taste alters with the cooking process therefore this step is highly recommended.
  6. Shape the mixture into bite size cutlets – about an inch to 1.5 inches in diameter.
  7. In a skillet, heat about a tsp of ghee (Just enough ghee to wet the skillet) Place the mini-cutlets in the skillet, and cook on low heat until crispy on the outside. As I do not use much ghee in the skillet initially, I like to brush the cutlets with a little ghee on the outside during the cooking process. This helps to give a nice golden color.
  8. Serve with coriander chutney or a coriander-mint chutney (click here for recipe) or chilli sauce.

IMG_7748

Notes:

  • The green chillies are an absolute must in this, if serving for adults. Adjust to your tolerance. I skipped it when I made it for V.
  • I added Teesi which made it healthier obviously. If you do not want to make Teesi, you can replace it with a tsp of roasted coriander powder and 1/8 tsp of chilli powder instead. The flavour will be different but good, nevertheless.
  • I used Vietnamese sweet potatoes to make this, as it is readily available here. The Vietnamese sweet potatoes have less moisture than many other varieties. I found it easy to shape and pan fry.

2013-08-14

Advertisement

Roasted Chicken with Rosemary

‘I don’t know what to cook tonight’ – a dilemma many of us face on a day-to-day basis. Every time, ok almost every time, you think of making dinner, you probably end up saying that to yourself. I do! A close friend has just initiated a group on Facebook by precisely that name – ‘I don’t know what to cook tonight’. She is a great cook herself and there are already some interesting recipes being shared there. Do hop on over there and join us:)

The first post in that group also happens to be a Rosemary Chicken. To see her recipe, check out the group. I promised to share to share my version as well, so here we go.

One warm, humid night in October last year, I made this absolutely juicy and flavourful chicken dish for the nth time. I took photos of the process, almost making the recipe dummy-proof. In case you are thinking how brilliant my memory is, just hold on to that thought. The reality is – it isn’t! The place where I live, is warm and humid practically most of the year 😉

Roasted Chicken with rosemary

So let’s rewind back to October 2012, I took out my [then brand new and now almost hammered phone], and clicked pictures of the making of this dish. Honestly, there are times when I really couldn’t be bothered with how the photograph turns out. And there are these other times, where I can go to any extent to get the photograph I want.

This Chicken is great for a weeknight meal, though you’ll need to do the marination before hand. 2 hours would be great but 1 hour will give you good results too. There’s no long list of spices for the marination. And other than the rosemary and the chicken, it’s ingredients which you’d most likely have in your pantry. The marination is an important step to give this dish that depth of flavour. The process of searing and then roasting at the right temperature is important to make the chicken juicy and packed with flavour.

For the printed recipe, click here.

Here’s how I did it :

Serves: 2-3
Marination time: 1-2 hours
Cooking time: 5 minutes for Searing + 20 minutes for roasting

Ingredients:

Chicken thigh (Boneless) : 230 gm each x 2 pcs (approx)
Dried rosemary herbs : 1 tbsp
Fresh rosemary stalk (optional) : You can skip this if you don’t have. I just added it while roasting because I had them this time : 2
Minced garlic : 1 tbsp
Olive oil : 1/2 tbsp to marinate + 1/2 tbsp for searing the marinated chicken.
Lime juice : 1 tsp
Coarsely ground black pepper powder : 1/4 tsp
Salt : to taste

Method:

1. Using a knife, make slits on the Chicken pieces. Marinate the Chicken for 1-2 hours with the above ingredients reserving 1/2 tbsp of oil for searing the Chicken. Make sure you rub the ingredients into the slits of the Chicken so that the flavours can go deep into the meat.

2. Preheat oven to 180 deg C.

3. In a skillet, heat 1/2 tbsp of olive oil. When the oil is hot and on high heat, sear the marinated chicken pieces on both sides for about 1-2 mins on each side. The idea is to give a golden brown colour to the chicken without completely cooking it.

4. Line a baking tray w aluminium foil. Place the seared chicken pieces on the aluminium foil and set it to roast for 20 minutes.

5. Remove from oven. Let it rest for 5 minutes before serving. We usually have this with some stir fried vegetables and a pasta or a pasta with vegetables in it.

Note: I have made this with Chicken breast meat as well and it tastes just as good. If using Chicken breast, roast for 15 minutes only or it will become very dry.

Step by Step

photo_

Crispy Salmon with Garlic Coriander sauce

Crispy Salmon with Garlic Coriander Sauce

There are 2 kinds of people in this world: Those that love Salmon. And those that don’t. That’s probably true of most things, but I couldn’t come up with a better opening line. So, there you go!

I happen to be the former and so is little V. I hereby declare my eternal love for Salmon. R, on the other hand, doesn’t quite get what the fuss is all about! But we [V and I] find a way to work around it. We just make him eat it. 😉 And he does.

We especially love the crisp skin of the Salmon. The skin absorbs a bit more salt than the rest of the fish and that makes it even more desirable. When there’s Salmon on the dinner table, all else doesn’t quite matter, does it? 🙂

I have made this countless number of times for V and it’s quick and easy to make. If you are a Salmon lover like me, I won’t need to sell the recipe to you because you will probably love it anyway 🙂

In it’s simplest form, all you need is some crushed garlic, salt, pepper and olive oil marinade with the salmon. Pan fry (with minimal oil) and you are done. In this version, I added a slight variant – fresh coriander leaves or cilantro. If you have a particular dislike for coriander, feel free to omit the coriander leaves.

We usually have this Crispy Salmon for dinner on a weeknight when I don’t want to spend too much time cooking. This goes well with a simple vegetable pasta or just plain rice and stir fried vegetables.

To print the recipe, click here.

Crispy Salmon with garlic coriander sauce

Serves: 2
Total time taken: Under 30 minutes
Preparation time: 20 minutes
Cooking time: 7-8 minutes

Ingredients:
Salmon fillet with skin on (about 250 gms)
Garlic cloves: 1-2 (adjust to taste)
Fresh coriander leaves – a bunch. Discard the roots.
Black pepper powder: a tiny pinch
Juice of ¼ of a lemon
Zest of ½ a lemon
Olive oil: 1 tbsp
Sea salt: to taste

How I did it:

1. Squeeze the lemon juice and zest on the salmon fillet. Sprinkle sea salt to taste. Put a little less than required as we will also season the sauce.

2. Prepare a quick blend of the garlic, coriander leaves including stalk but not the roots, a tsp of olive oil and sea salt.

Preparing the garlic-coriander sauce.

3. Rub the prepared coriander, garlic sauce (the marinade) on the salmon. Sprinkle a dash of black pepper powder. Let the Salmon marinate for about 15 minutes.

Rub the Marinade on the salmon.

4. Heat a pan. Add the remaining olive oil (2 tsp). Make sure the the oil is hot before placing the salmon fillet in it. This step is important to prevent the fish from breaking and disintegrating.

5. Place the salmon fillet, skin down first. Reduce flame to lowest. Cover and let it cook for 5 minutes.

Heat a pan. Add olive oil and place the marinated Salmon, skin down. Cover & let it cook for 5 minutes.

6. After 5 minutes, turn the salmon for another minute. Do not cook on this side for long as the salmon will start to overcook.

Turn the Salmon over and cook for another minute.

7. Serve w lemon wedges.

Crispy Salmon with Garlic Coriander Sauce

Beet root, potatoes and peas tikki / cutlets

It has been many months since my last post. A friend rightly pointed out that it’s that perfectionist attitude in me which is causing this inertia – I want the food to be perfect and the photographs to be styled and taken well (to the best of my ability!) However, to get all these things together, requires a lot of time and patience. With an extremely active 3 year old in the house, time is one luxury I don’t have.

As a result, I have been cooking and experimenting at home but unfortunately, I haven’t been able to post anything for the past few months. I feel a little selfish at this point so I definitely owe you all an apology. Many of you have been supportive over these past few months of silence – either by checking on me or by just by being connected through images that I have been posting on my facebook page (http://facebook.com/sublimepalate). A big thank you for that and sorry for being MIA.

So, I have decided to give that perfectionist in me a sorta break..  And post recipes and stories .. even though sometimes the pictures may not be perfect.. the recipes may…  – NO,  be rest assured – there will be no compromise on that front!:-) These photos are taken from my phone, so please excuse me if they aren’t nice enough.

So, starting off again, here’s a recipe of a healthy snack, I read on one of my favorite blogs, sinfully spicy.  This is a great snack for kids and adults alike! I took a portion of the tikki mix to make 3 tikkis for V. To the remaining portion, I added finely chopped green chillies.It is inspired by Tanvi’s beetroot tikkis. Ever since I saw that, I just had to make it! So for Tanvi’s recipe, check : http://sinfullyspicy.com/2012/06/27/beetroot-tikki/

Thank you Tanvi for this amazing snack! 🙂

Here’s how I made it:

MAKES 8 tikkis / cutlet:

You’ll need:

Beetroot: 1 medium sized
Potato: 1 small sized
Peas: 1 cup. Boil if using fresh. I used frozen peas and microwaved with a tiny pinch of salt for 2-3 mins to soften it so that it’s easy to mash.
Onion: 1 small size (or roughly 1/2 a cup of finely chopped onion)
Ginger: 1 small pc (adjust to your taste)
Garlic: 1-2 cloves
Green chillies – 2-3
Black pepper powder – 1 tsp (preferably coarsely powdered)
Bread crumbs – 4 heaped tbsp. (If you don’t have bread crumbs, use a slice of bread. Gently soften it by sprinkling a little water and mashing it separately first and then adding it to the mix).
Semolina (Suji) – 3 tbsp or more for coating the tikkis.
Oil – 1-2 tbsp.

Preparation:

  1. Boil the potato so that they are cooked but firm. A little undercooked is fine but mushy potatoes may not bind the mix that well.
  2. Finely chop onions, ginger, garlic and the green chillies.
  3. Finely grate beetroots. Squeeze out the juice by hand. Drink the juice (It was yum .. I strained it and had it without adding anything. But I think a squeeze of lime should go very well). Anyhow, coming back to the grated beetroots, keep it in aside and move on.
  4. Peel and finely grate the boiled potato. If you are brave, try grating it while it is hot! Just kidding – DON’T ! I almost burnt my palm. The inside of the potato retains a lot of heat so it’s advisable to take a little break and grate them when they have cooled off.
  5. Mash the softened peas.
  6. Start working on the next step (mixing) only before you need to make the tikkis. The salt releases a lot more moisture and makes it difficult to bind.
  7. In a mixing bowl, add the grated potatoes, beets, mashed peas, onions, ginger, garlic, bread crumbs, black pepper powder, chaat masala & finally the salt. Gently combine this mix without mixing it too much! The more you mix, the more moisture gets released and your tikkis won’t hold together.
  8. Make small cutlets / tikkis with this mix (oval or round shape can work). With this quantity, I ended up with 8 tikkis.
  9. In a flat plate, keep the semolina. Very gently press the tikki on the semolina mix to coat the tikki with the semolina.
  10. Heat 1 tbsp of oil in a non-stick pan. I fried about 3 per batch in a small non-stick pan. Add more oil when frying the next batch, if needed. Make sure the oil is hot before you add the tikkis. On low heat, fry the tikkis for a few minutes on each side until crisp on the outside. Be gentle when turning the tikkis. If the heat is low, cook for a little longer to get a crispy outside while making sure the inside is cooked.
  11. I had these with my go-to green chutney!

Hope you enjoy them as much as I did.